Posted on

How to Keep Chipmunks Out of Your Garden

How to Keep Chipmunks Out of Your Garden

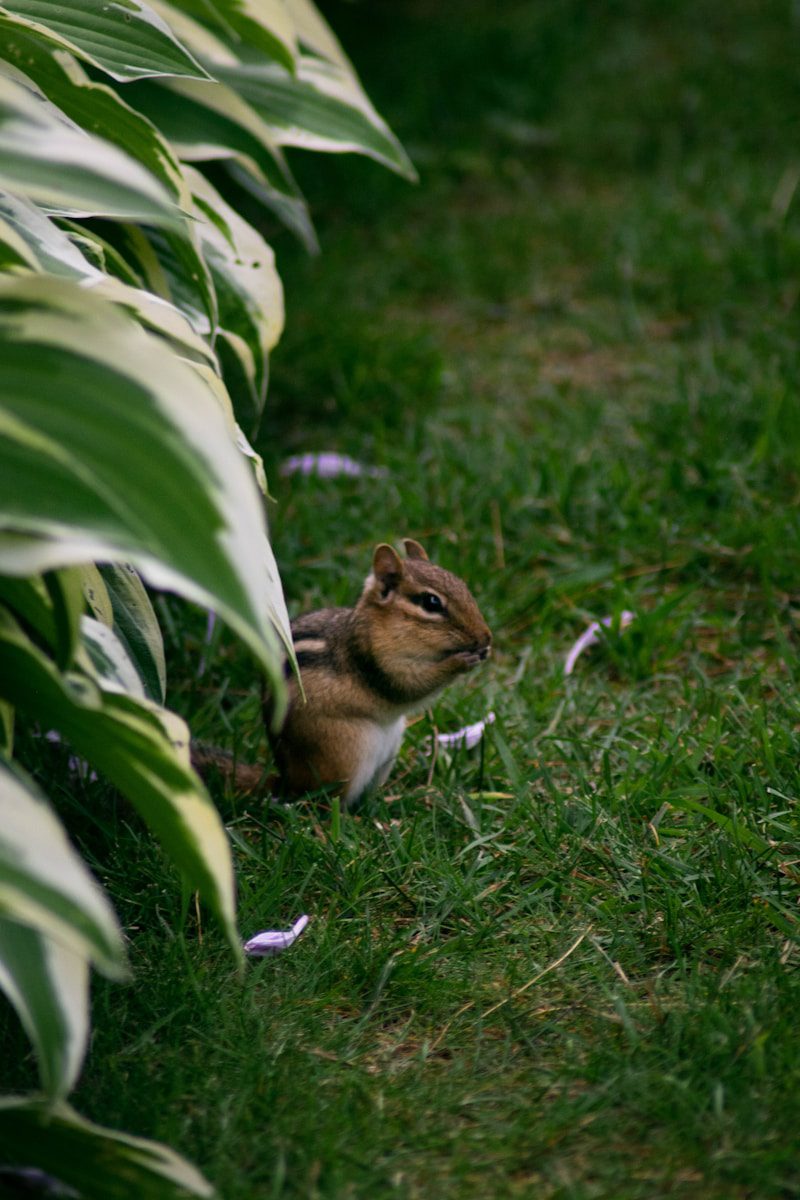
A garden full of fresh blooms and ripening produce is a gift. But if you’ve spotted little tunnels, dug-up bulbs, or half-eaten fruit, you may have tiny striped visitors. Chipmunks, while adorable, can quickly become disruptive. They dig for seeds, snack on berries, and stash food in your beds. The good news is that we can keep them at bay without spoiling the beauty or peace of our garden.


Why Chipmunks Target Gardens

Chipmunks are opportunists. They forage constantly, looking for seeds, nuts, fruits, and young plants. Your garden offers all of these in one place. Loose soil is easy for them to dig, and low-growing plants are simple to reach. They don’t just take a little—they often uproot or damage plants in the process.

Understanding this habit helps us protect our spaces. Instead of seeing them as pests, we see them as hungry neighbors who need gentle boundaries.


Smart Ways to Protect Plants

Fencing and Barriers

A sturdy fence makes the biggest difference, but chipmunks are small and clever.

  • Hardware cloth: Use ¼-inch mesh around raised beds and bury it 8–12 inches deep to block tunnels.
  • Bulb cages: When planting tulips or other favorites, enclose bulbs in wire mesh so chipmunks can’t dig them up.
  • Row covers: Lightweight fabric or mesh can shield seedlings until they’re strong enough to withstand some nibbles.

Natural Deterrents

Scents play a powerful role. Chipmunks dislike strong smells, so use that to your advantage.

  • Garlic and hot pepper sprays: Apply around plants and soil. Reapply after rain.
  • Predator scents: Products made with fox or coyote urine can create the illusion of danger.
  • Herbs and flowers: Planting strong-scented companions like mint, daffodils, or alliums along borders helps discourage digging.

Motion and Surprise

Chipmunks don’t like surprises.

  • Motion-activated sprinklers: A quick burst of water sends them running.
  • Wind spinners or reflective tape: Sudden flashes and movement make the area feel unsafe.
  • Ultrasonic devices: Some gardeners find success with these, though results vary.

Building Better Habits Around the Garden

Beyond barriers and sprays, your own habits can help reduce visits.

  • Harvest often: Don’t leave fruit or vegetables to overripen—it attracts chipmunks.
  • Clean up fallen produce: Any apples, berries, or seeds on the ground are an open invitation.
  • Remove hiding spots: Chipmunks love brush piles, wood stacks, and tall grass. Keeping the garden edges clear reduces their comfort.
  • Feeders with care: If you have bird feeders, use baffles and trays to minimize seed spills, which draw chipmunks closer.

Creating Balance With Wildlife

The goal is not to drive chipmunks away from nature. It’s to guide them away from your hard work. With smart fencing, natural repellents, and a little change in routine, you can protect your plants and still enjoy the life around you.

A garden is a shared space. When we learn how to set gentle boundaries, we get to enjoy ripe tomatoes, blooming flowers, and the peace of knowing our efforts will last. In the end, the balance between beauty and wildlife makes the garden even richer.

Posted on

How to Get Rid of Earwigs in the Garden

How to Get Rid of Earwigs in the Garden

When you step into the garden early in the morning, you might notice chewed leaves, ragged petals, or little holes in young seedlings. The culprits often hide in the shadows: earwigs. These little brown insects with pincher-like tails can look intimidating, but in truth, they’re more of a nuisance than a danger. Still, if their numbers rise too high, they can quickly damage tender plants and flowers.

The good news? Earwigs are not impossible to control. With a mix of smart prevention, simple traps, and natural methods, you can reduce their numbers and protect your plants without harsh chemicals. In this guide, we’ll walk through what earwigs are, why they show up, and the best ways to keep them in check.


Understanding Earwigs in the Garden

Before we jump into control methods, it helps to know a little about these insects.

  • What they look like: Earwigs are slender, reddish-brown insects, usually about ½ to 1 inch long. Their most noticeable feature is the pair of curved pincers on their back end.
  • When they appear: Earwigs are nocturnal. That means they hide in dark, damp places during the day and come out at night to feed.
  • What they eat: They are omnivores. That means they eat a mix of things—soft plants, flowers, seedlings, and sometimes smaller insects. In small numbers, they can actually be helpful, eating aphids and other pests. In large numbers, they become destructive.

Earwigs love moisture and shelter. If your garden has a lot of mulch, dense plant cover, or damp hiding spots, they may settle in and multiply.


Steps to Reduce Earwigs Naturally

Now let’s look at how to get rid of them without turning to chemicals right away.

1. Remove Hiding Spots

Earwigs hide under pots, boards, mulch, and garden debris. By clearing out piles of leaves, trimming back thick ground cover, and moving stacked pots, you take away their daytime shelters. Fewer hiding spots mean fewer earwigs.

2. Water Smartly

Because earwigs love damp soil, overwatering creates a perfect home for them. Water plants in the morning instead of at night. That way, the soil dries a bit before evening, and the garden is less inviting when earwigs come out.

3. Use Simple Traps

One of the easiest ways to reduce earwig numbers is to trap them. Here are some classic traps:

  • Rolled newspaper: Dampen a few sheets, roll them up, and place them in the garden at night. Earwigs crawl in to hide. In the morning, shake them out into a bucket of soapy water.
  • Cardboard tubes: Empty toilet paper or paper towel rolls also work. Place them near plants, then collect and dispose of earwigs in the morning.
  • Oil traps: Bury a shallow can or container (like a tuna can) in the soil so the rim is level with the ground. Fill it with a little vegetable oil and soy sauce. The scent lures earwigs in, and they drown in the oil.

4. Encourage Natural Predators

Birds, toads, and ground beetles all eat earwigs. By welcoming these allies into your garden—through bird feeders, water sources, and safe shelter—you can keep earwig numbers balanced naturally.


Using Barriers and Safe Controls

Sometimes, traps and tidy-up are not enough. In those cases, barriers and safe treatments can help.

Barriers Around Plants

You can keep earwigs away from seedlings and delicate flowers by using collars made from cardboard or plastic cups with the bottoms cut out. Place these around plant bases so earwigs cannot climb easily.

Diatomaceous earth, a natural powder made from fossilized algae, can also be sprinkled around plants. It has tiny sharp edges that damage soft-bodied insects, including earwigs. Just be sure to reapply after rain or watering.

Safe Sprays

If earwigs are heavy, you can use sprays like neem oil or insecticidal soap. These are safer for the garden than harsh chemicals, but still effective. Spray them directly where earwigs hide, usually in the evening.

Avoid broad-spectrum chemical pesticides if you can. These can harm beneficial insects and upset the balance of your garden.


Long-Term Garden Balance

The goal is not to wipe out every single earwig. In fact, a few can actually help by feeding on smaller pests. The real aim is balance—keeping numbers low enough that your plants thrive without damage.

Think of earwig control as part of an overall garden system:

  • Keep the garden tidy, with fewer hiding places.
  • Water wisely to reduce damp conditions.
  • Use traps to catch active earwigs.
  • Encourage birds, toads, and other natural helpers.
  • Add barriers and safe sprays only when needed.

When these steps come together, you’ll notice fewer chewed leaves and healthier plants. And instead of worrying about earwigs each season, you’ll feel in control of your space.


Growing Calm Among the Flowers

So, how do we get rid of earwigs in the garden? By blending simple prevention with natural control. It’s about guiding the balance back toward health, not fighting a never-ending war.

With rolled newspapers, tidy beds, and a few well-placed traps, you can bring peace back to your flowerbeds and vegetable rows. And once the garden is calm again, you get to enjoy the real reward—watching blooms open and vegetables ripen without the worry of pinched, chewed leaves stealing the show.

Posted on

How to Keep Raccoons Out of Your Garden

How to Keep Raccoons Out of Your Garden

Raccoons may look cute with their ringed tails and masked faces, but in the garden they are anything but friendly. They dig up beds, steal ripe produce, knock over containers, and leave behind a mess that no gardener enjoys. If you’ve ever found half-eaten tomatoes or corn stalks pulled apart overnight, chances are a raccoon paid you a visit.

The challenge is that raccoons are clever. They climb, dig, and figure out simple latches. But with the right mix of barriers, deterrents, and smart garden habits, we can outsmart them. Let’s walk through the best ways to keep raccoons out of your garden so you can protect both your harvest and your peace of mind.


Build Barriers That Work

The most reliable way to stop raccoons is to keep them from getting in at all. That means building barriers that match their skills.

Fencing is the first line of defense. Raccoons can climb, so an ordinary garden fence often isn’t enough. To make it effective, go for a wire mesh fence that’s at least 4 feet tall. Angle the top outward or add an electrified strand a few inches above the fence. This discourages climbing.

The bottom matters just as much. Raccoons dig, so bury the mesh at least 6 inches into the ground. For extra protection, bend the buried part outward like an “L” so they can’t tunnel under.

If you grow corn, melons, or other sweet crops, a portable electric fence is a strong option. A low-voltage setup around the bed teaches raccoons to stay away after a single shock. It’s not harmful, but it sends a clear message.

Raised beds with covers also help. Wire cages or hoop tunnels made with hardware cloth can protect individual crops. These are especially handy during peak harvest weeks when raccoon pressure is highest.


Use Deterrents to Shift Their Behavior

Barriers are strong, but adding deterrents makes your garden even less attractive. Raccoons are cautious by nature, so strange smells, sounds, and lights can unsettle them.

Motion-activated sprinklers are a favorite tool. When a raccoon steps into range, it gets a sudden spray of water. The surprise usually sends it running.

Lights and sound devices work in a similar way. Solar-powered lights that flash at night or radios set on a timer can create an environment raccoons find uncomfortable. Just remember to change the setup often, since raccoons learn quickly and may get used to the same routine.

Smell is another tool. Many repellents use predator urine (like coyote or fox) to trick raccoons into thinking danger is nearby. Homemade solutions like garlic, hot pepper spray, or vinegar can also discourage them. Reapply after rain for the best effect.

Some gardeners also swear by scattering used coffee grounds, strong soap shavings, or even spreading human hair around the beds. While results vary, these tricks can add another layer of confusion for visiting raccoons.


Practice Smart Garden Habits

Raccoons are drawn to food and shelter. By changing a few habits, you make your garden less tempting.

  • Harvest often. Ripe fruits and vegetables are a magnet for raccoons. Pick them as soon as they’re ready.
  • Remove fallen produce. Dropped tomatoes, apples, or melons send a strong signal that food is easy to grab. Clean them up daily.
  • Secure compost and trash. Raccoons love leftovers. Use tight-fitting lids and avoid leaving scraps where they can dig in.
  • Eliminate hiding spots. Tall grass, wood piles, and brush near the garden give raccoons cover. Keeping the area tidy makes them feel exposed and less likely to linger.
  • Lock up chicken coops or pet food. These are extra food sources that encourage raccoons to hang around. Keeping them sealed keeps the pressure off your crops.

In other words, if you remove the easy meals and the safe hiding spots, raccoons will likely look elsewhere.


A Garden Free of Midnight Bandits

Raccoons may be clever, but with a thoughtful plan, you can keep them out of your garden. Strong fences stop their climbing and digging. Deterrents confuse and scare them away. Smart habits reduce the temptations that lure them in.

When you put these steps together, your garden becomes less of a target and more of a fortress. You’ll rest easier knowing your tomatoes, corn, and melons will be there waiting for you in the morning.

A raccoon-free garden means more harvest, less stress, and nights of peaceful sleep without wondering what’s rummaging outside. That’s the reward of being prepared—a thriving garden, safe from masked intruders.

Posted on

Best Vegetables for Container Gardening on Patios and Balconies

Best Vegetables for Container Gardening on Patios and Balconies

Container gardening has opened the door for anyone to grow fresh vegetables—even without a backyard. A sunny patio or small balcony can transform into a productive mini farm. With the right vegetable choices and simple care, you can enjoy crisp greens, colorful peppers, and juicy tomatoes right outside your door. This guide walks you through the best vegetables for container gardening, why they thrive in small spaces, and how to make your harvest abundant.


Why Container Gardening Works So Well

Container gardening is more than just a space-saver. It’s also about control. By growing vegetables in pots, buckets, or troughs, you can manage soil quality, water levels, and sunlight with ease. This reduces pests and diseases that often come with ground planting. It’s also ideal for renters or urban dwellers who don’t have access to traditional garden plots.

Most of all, container gardening is flexible. You can move plants to chase the sun, bring them inside during a cold snap, or rearrange them to create a living green screen for privacy.


What Makes a Vegetable Perfect for Containers?

Certain traits make some vegetables thrive in containers:

  • Compact growth habit – Plants that stay small or bushy do better than sprawling types.
  • Short growing season – Vegetables that mature quickly are easier to manage in limited space.
  • High productivity per plant – The more food one plant produces, the better for container gardeners.
  • Adaptability to shallow roots – Crops that don’t need deep soil thrive in pots.

Now let’s dive into the vegetables that check all these boxes.


Leafy Greens: Fast and Fuss-Free

Lettuce

Lettuce is a classic for container gardens. It grows quickly, tolerates partial shade, and offers endless harvests if you cut outer leaves instead of pulling the whole plant. Loose-leaf varieties like ‘Black Seeded Simpson’ or ‘Buttercrunch’ work especially well.

  • Container size: 6–8 inches deep
  • Sun: 4–6 hours
  • Tip: Sow every 2–3 weeks for nonstop salads.

Spinach

Spinach thrives in cool weather and grows fast, making it a perfect spring and fall crop. It does well even in shallow containers and can be harvested baby-leaf style.

  • Container size: 6–8 inches deep
  • Sun: 4–6 hours
  • Tip: Keep soil moist to prevent bolting (flowering too soon).

Kale

Kale’s sturdy leaves hold up well to container life and can be picked for months. Compact types like ‘Dwarf Blue Curled’ are ideal for tight spaces.

  • Container size: 8–10 inches deep
  • Sun: 6+ hours
  • Tip: Harvest outer leaves often to encourage new growth.

Compact Fruiting Vegetables

Cherry Tomatoes

Tomatoes are container favorites, and cherry types are the most forgiving. They ripen quickly, produce heavily, and don’t sprawl as much as big slicers. Look for dwarf or patio varieties like ‘Tiny Tim’ or ‘Tumbling Tom.’

  • Container size: 12–16 inches deep (5+ gallons)
  • Sun: 6–8 hours
  • Tip: Stake or cage early to support heavy fruit clusters.

Peppers (Sweet and Hot)

Peppers love the heat and stay compact, making them excellent for pots. Bell peppers, jalapeños, and even ornamental chilies do well in containers with full sun and rich soil.

  • Container size: 10–12 inches deep (3+ gallons)
  • Sun: 6–8 hours
  • Tip: Use a lightweight potting mix and water consistently to prevent blossom end rot.

Bush Beans

Bush beans don’t climb, so they fit nicely in small planters. They mature quickly and provide multiple harvests throughout summer.

  • Container size: 8–10 inches deep
  • Sun: 6–8 hours
  • Tip: Plant in batches for a steady supply of beans.

Root Vegetables for Deep Containers

Radishes

Radishes grow in just 3–4 weeks, making them perfect for impatient gardeners. They don’t need deep soil and are a great starter crop for beginners.

  • Container size: 6–8 inches deep
  • Sun: 4–6 hours
  • Tip: Keep soil loose so roots form evenly.

Carrots

Carrots thrive in containers, especially short or round types like ‘Parisian Market’ or ‘Little Finger.’ These varieties are bred for shallow soils.

  • Container size: 10–12 inches deep
  • Sun: 6–8 hours
  • Tip: Thin seedlings early for proper root development.

Beets

Beets give you both edible roots and leafy greens. They do well in deep containers and are tolerant of cooler weather.

  • Container size: 10–12 inches deep
  • Sun: 6+ hours
  • Tip: Harvest young greens as you thin seedlings for tender leaves.

Herbs: The Perfect Companion

Though not technically vegetables, herbs pair beautifully with container veggies. Basil boosts tomato flavor, mint repels pests, and parsley thrives in partial shade. Mix herbs into your vegetable pots or give them their own containers.

  • Best herbs for containers: Basil, chives, cilantro, parsley, thyme, mint
  • Container size: 6–8 inches deep for most herbs
  • Tip: Pinch flowers to keep plants producing leaves longer.

Choosing the Right Containers

The container is just as important as the vegetable. Here’s what to look for:

  • Depth: Match pot depth to root needs. Leafy greens need 6–8 inches; tomatoes need 12–16 inches.
  • Drainage: Holes at the bottom are non-negotiable to prevent root rot.
  • Material: Plastic retains moisture, terracotta breathes, and fabric pots encourage strong roots.
  • Size: Bigger is better—more soil means fewer waterings and stronger plants.

Repurposed containers like buckets, crates, or old tubs also work well, as long as they drain properly.


Soil and Fertilizer Basics

Container veggies need light, airy soil—not heavy garden dirt. Use high-quality potting mix with added compost or slow-release fertilizer. During the growing season, supplement with liquid feed every 2–3 weeks, especially for heavy feeders like tomatoes and peppers.

  • Tip: Mix perlite or vermiculite into the soil to boost drainage and aeration.

Watering Made Simple

Containers dry out faster than garden beds. A consistent watering routine is key:

  • Check daily: Stick your finger in the soil—if dry 1 inch down, water deeply.
  • Morning watering: Best time to reduce evaporation and prevent fungal issues.
  • Self-watering pots: Great for balconies where you may forget to water.

Mulching with straw or shredded leaves also helps keep soil moist and cool.


Arranging Your Patio Garden

Think vertically. Use plant stands, shelves, or railing planters to maximize space. Group sun-loving plants together and keep shade-tolerant greens lower. Trailing plants like cherry tomatoes or strawberries look stunning cascading over the edges of hanging baskets.

Companion planting works beautifully in containers too. Pair basil with tomatoes, or tuck radishes around peppers to fill empty soil space.


Seasonal Planting Tips

  • Spring: Focus on greens, radishes, and peas.
  • Summer: Switch to heat lovers like tomatoes, peppers, and bush beans.
  • Fall: Bring back kale, spinach, and carrots for cooler weather harvests.
  • Winter (mild climates or indoors): Grow lettuce, herbs, and microgreens under grow lights or in sunny windows.

Troubleshooting Common Issues

  • Yellow leaves? Often a sign of overwatering or nutrient deficiency.
  • Wilting in heat? Provide afternoon shade or water more frequently.
  • Few fruits? Pollinate flowers manually with a small brush or shake the plant gently.
  • Pests like aphids? Spray with soapy water or introduce ladybugs.

Creating a Mini Oasis

Container gardening on patios and balconies is more than food—it’s an experience. You’ll notice bees visiting, the joy of plucking a tomato warm from the sun, and the scent of basil drifting in the air. These small gardens turn overlooked spaces into thriving retreats.


Harvest Abundance in Small Spaces

You don’t need acres to grow fresh vegetables. A few well-chosen plants, good soil, and thoughtful care can fill your kitchen with homegrown flavors all season long. Whether you’re growing crunchy carrots in a bucket or lush lettuce on a windowsill, container gardening proves that abundance can happen anywhere—even on a balcony high above the street.