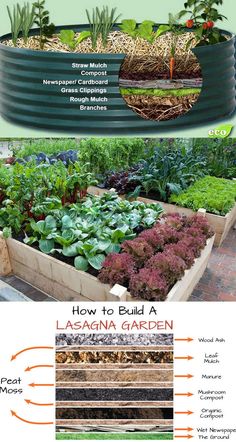
Posted on

Planting A Fall Vegetable Garden

If you’re like most gardeners, you probably consider August to be the tail end of the growing season. The truth of the matter is that it’s a great time to start your fall garden.

A fall garden can produce excellent vegetables and extend your crops long after your spring planted garden is finished. The vegetables you harvest from the fall garden are often sweeter and milder than those grown over the summer.

What type of vegetable plants you plant in your fall garden will depend on the space you have, as well as the types of vegetables you like. Be sure that you plant vegetables with the shortest growing season, this will increase the chances they will be full grown and harvested before the hard frost sets in. Starting your seeds indoors the first week of July will also give you a good head start.

Most seed packages will be labeled “early season”, or you can find the seeds that are labeled with the fewest days to harvest.‚  Since seeds are not usually kept in stock towards the end of summer, you will probably need to purchase seeds for your fall garden in the spring. You can also find them easily online.

Even vegetables that like the heat of summer, like tomatoes, sweet potatoes, and peppers, will produce nicely until harder frosts hit, which can be fairly late in the year in certain areas.

There are certain vegetable plants that normally stop producing towards the end of summer. These include snap-beans, summer squash, and cucumbers. Even these, if planted in the middle of summer, can produce nicely until the first frosts arrive. Many hardy vegetables will grow with temperatures as low as 20 degrees.

If you have root plants such as beets, carrots or radishes, that have the tops killed by a freeze, you can save them by applying a heavy layer of mulch.

For fall gardening you need to know approximately when the first hard frost normally hits your particular area.  The Farmer’s Almanac is a great resource for this type of information.  It will give you specific dates and is fairly accurate most of the time.  You also need to know approximately how long your plants will take to mature. As I said, this is available by reading the individual seed packets.

To prepare the soil for your fall garden, the first thing you will need to do is clear out leftover summer crops and weeds.  If you leave the leftover vines and plant debris from your summer crops, bacteria and diseases can develop from these leftover remnants.  If your spring plants were not fertilized heavily, you may want to spread a few inches of compost over the garden next.

Once that is done you will need to till the soil and wet it down. Now simply wait 24 hours and your ready to plant.

All too often gardeners will shy away from planting a fall garden, to avoid dealing with frosts. I can tell you from experience that sturdy and healthy vegetables can stand up to a few frosty nights, while producing wonderfully tasting produce.

Fall gardening is not for everyone, but why not give it a try? It can provide you with the opportunity to enjoy garden fresh vegetables for a little while longer each year.

Posted on

Creating and Planting a Beautiful Container Garden

Creating and Planting a Beautiful Container Garden

We all have a garden planter or two dotted around our gardens, perhaps filled with a specimen plant or a seasonal display. But there is a lot to be said for using containers as the design basis for creating a garden. Containers are probably one of the most versatile forms of gardening, allowing you not only to choose type of container but also the plant and its location. There are many advantages to container gardening. You can move your containers to different locations within your garden, thereby creating an instantly different effect. You can change planting displays as often as you like, perhaps making the most of the choice of different seasonal plants. You can also grow plants which like different soil types to your own by simply filling them with the right type of compost.

Types of Garden Planters and Containers

There are an ever increasing number of different types of container you can buy, with materials and designs to suit every climate and different tastes. Pots and tubs are probably the most popular type of planter available. They are for the most part versatile and easily moved to different positions in the garden. Pots and tubs come in an enormous variety of sizes and designs, both traditional and modern. Materials vary from moss covered terracotta and artificially aged stone planters, to reused car tires and fiber glass. There are no rules when it comes to choosing a type of container and there is no reason why you can’t combine traditional with modern. Just be aware that your designs and materials complement each other in some way.

Pots and tubs are equally as versatile when it comes to planting. You can grow almost anything you like in a container. Formally clipped box and other evergreens look stunning as focal points, as do specimen standard plants such as bay trees. Group a number of planters of different sizes together with a plant type such as herbs. A particularly stunning planter can be filled with seasonal annuals for an all year round display.

Window boxes are another great way to grow plants and enhance the appearance of your house and garden. Window boxes are particularly useful if you have a tiny garden or even if you have no garden at all! You can buy ready- made window boxes, have them made bespoke to your requirements or simply make your own. Window boxes don’t have to be made of wood. I have seen some beautifully aged metal ones as well as reconstituted stone ground-level boxes. Grow seasonal displays or plant up a box outside your kitchen window with herbs or easy to grow edibles like lettuce.

Hanging baskets are probably the most versatile of all containers. They can be hung on walls, fences and even in trees. Not only can your display be changed from season to season, but you can also grow edible plants such as tumbling tomatoes and strawberries and even a selection of herbs, hung near your kitchen door. Hanging baskets also come in a variety of shapes and sizes. More traditionally made from wicker, but I have seen some great modern alternatives made from brightly colored plastics.

Troughs and sinks can be used to create mini container gardens in one place. Although strictly speaking you can grow anything you like in a trough shaped planter, the lack of depth makes them more suited to growing alpines and herbs. Stone troughs probably look the best in any garden but why not also think about getting hold of an old Belfast sink which looks particularly effective when planted with herbs under a kitchen window.

Another type of container not readily thought about is the raised bed. Raised beds are a great way of growing both vegetables and garden plants. They are easy to maintain and therefore popular with gardeners with impaired mobility. They are also an easy way of adding structure to an otherwise flat garden space, lifting plants higher up and creating the illusion of different levels to a garden.

Some Container Planting Rules

If you are going to maintain a healthy container garden, there are a few rules you will need to follow whatever type of planter. Drainage is all important for container grown plants. Make sure your container has adequate drainage holes and always add some broken pot or crocks to the bottom of the planter to aid drainage. If your container is to be placed on a hard surface, sit it on some feet to raise it above ground level slightly. Use the right type of compost. Try not to overcrowd your container, most plants will need plenty of room to spread their roots and grow into healthy specimens. Conversely, don’t let your plants become pot-bound. Although there are a few plants which do well in these conditions, as a rule, either divide you plant or re-pot it into a larger container.

In extremely cold weather both your containers and their plants will need some protection. For those that are not frost hardy it is probably best to over winter them into a cold greenhouse. Others can be wrapped in straw or fleece to protect them from frost.

Perhaps the most important consideration of all for container grown plants is water. During dry weather in the summer months you will have to make sure your pots are well watered. Materials like terracotta dry out quickly as the clay absorbs water, so you will often find yourself having to water at least twice a day. Early morning and evening is best. During the winter water container plants sparingly. Waterlogged containers easily freeze killing the roots of the plants in them.

I am a firm believer that a garden reflects some of the personality of the gardener who tends it. Garden planters are a great way of putting your stamp on a garden, particularly if you are a little bit quirky! I have seen old wooden boats used as planters, odd worn out walking boots, pan tiles, antique wash tubs, old car tires and even a disused toilet!

Reusing Plastic Containers and Planters

Anyone who has a garden or ever got a potted plant has had to deal with those seemingly useless plastic pots. Most people throw them out. I save them until they crumble-re-using over and over again. They can be the “greenest” item in your garden that save you the most green.

I have a very small gardening space including containers but big or small practical ways maybe “green” now but will always make sense far after being GREEN loses fashion.

So what to do with all those unsightly plastic pots? Whether you have an established garden or just starting out; when you buy plants you will have to deal with re-using or disposing of them.

Plastic pots have an endless amount of uses in the garden. So before you just think re-cycle re-think they can save you money before tossing them out:

Seeds eventually become seedlings needing a larger pot; having pots on hand is both convenient and cost-saving.

Small pots make excellent large pot fillers. Place a small pot upside down in a larger one then fill with soil and plant. Container is lighter with less soil used.

Instead of throwing out the cell flats, crumble up and use as a large container filler too. [Or wash and use as packing material.]

Place invasive plants inside of the pot then plant in the ground for keeping them in-check.

Have too many plants? Bought too many? Divide both annuals and perennials using pots to share plants. Don’t have to worry about loaning out your expensive ones.

Don’t have drainage holes in that pretty container? Put plant in a plastic pot then place inside the prettier one. [Don’t forget to pour out any excess water.]

Wish you could afford more expensive containers? Take plastic pots, spray paint assorted colors then add decorative ribbons, beads or sphagnum moss to make appealing.

Don’t like to water? Plastic holds moisture longer so use instead of terra cotta [I still recommend terra cotta for herbs in almost all instances.] Works for indoor/outdoor plants.

Just planted a new plant? Use plastic container as a cloche or shield to protect until established.

Threat of frost? Use containers to cover tender plants. Use 2 pots together to block out holes and create a better insulator.

Weeding. Keep containers around as receptacles when pulling them out.

Use to make compost or save potting soil.

Use small pots as scoops for mulch, fertilizer, etc.

Use to prop up other containers to create different plant levels.

Use to hold garden tools.

Plant below ground level then put smaller pots filled with annuals for easy change-ups.

Storing bulbs or use for overwintering plants.

As you can see the possibilities are endless. These are the pots that cost nothing but continue to save you money over and over again. $$$$$. How Green is that?

5 Gallon Buckets in the Garden

Continuing the discussion of how important the often underestimated 5 gallon buckets at home, we are now revealing how we can make the best use of these pails in the garden.

As pots

Although the appearance of the 5 gallon pails may not look as charming as the real gardening pots, they are highly functional and cheaper. Good quality 5 gallon buckets cost between $ 3 and $ 6; which is nothing compared to gardening pots’ price. With some little preparation, the pails can be turned into flower pots instantly.

All you have to do is to drill the bottom of the 5 gallon buckets with ‚½ or ‚¼-inch holes to allow water drainage. 10 to 15 holes are enough for 5 gallon pails. Next is to fill in the buckets with good quality potting soil and fertilizer. It is now ready to be planted.

If you care about upgrading the look of the modest 5 gallon pails, you may want to put more time before filling in with soil. Get some paint with the color you like, paint the pails, give some accents with different colors of paint, and dry it completely. Remember to paint only on the outer side for vegetables and herbs gardening. You don’t want the vegetables you grow to take the chemical substance of the paint since you will be eating them later.

Another advantage of having 5 gallon buckets garden is that it is extremely practical. You can move the pots wherever and whenever you want. If the growing season is over, you can pile them up and store the soil for the next gardening season, or you can just move them indoor if the plant thrives to survive there. The 5 gallon buckets also make it more difficult for animals like rabbits to destroy your plants.

Now you have not only a cheap way to grow your herbs and plants, but also creative and practical ways too.

As compost containers

Compost plays an important role in the life of a plant. Good homemade compost even plays more important role in the environment. Oddly enough, your plastic 5 gallon pails can help make this happen. As the container of compost making.

First of all, you should drill ‚¼-inch holes around the sides of the bucket. This will allow air circulation and water drainage. Line the bottom of the pail with dry leaves and soil. After that, dump your table scraps like vegetables, napkins, eggshells, coffee grounds or tea bags inside the bucket. Avoid milk and meaty stuff since this could attract vermin. Cover again with dry plant debris and soil. Do one dry layer after the wet one continuously and wait until the 5 gallon pail is filled up. Have a lid to close the pail and let the microorganisms work the compost. Check it out from time to time whether it is too dry or too wet. If it is too dry, add some water and move it to a shadier place. If it is too wet, place it under the sun to dry a little bit. This process takes from several weeks to months to complete.

The better pails to use for homemade composting are the ones in dark colors. Black will be the best. It will absorb more heat for the microorganisms to live under the shade.

If you use 5 gallon buckets in your garden for those purposes mentioned above, you will definitely promote an environment friendly gardening and at the same time save money for a better use at home.

Happy gardening!

Posted on

Do Old Coffee Grounds Work As Fertilizer?

First, what makes up brewed coffee, besides caffeine? Nutrition experts agree that coffee grounds contain magnesium, phosphorus, potassium, copper, manganese and trace amounts of calcium. Nitrogen, phosphorus and potassium are the ingredients necessary for garden soil. They coincide with the figures you see on most garden fertilizer bags. So coffee does have what plants need to grow.

There seems to be some debate about whether or not coffee produces nitrogen. Most agree that coffee grounds contain 1.5 to 2.2% nitrogen. However, some feel that the nitrogen is not available to the soil or the plants until the grounds themselves begin to decompose.

Others say you must compost the coffee grounds with other plants to release the nitrogen in the decomposition process. They recommend adding nitrogen to the soil if using only the grounds. The rotting grounds attract nitrogen-consuming microbes, thus, the need to add nitrogen if using only coffee grounds as a fertilizer.

So to be on the safe side where fertilizing is concerned, you may be better off tossing your coffee grounds along with other compost into the garden in the fall and winter to allow them time to be of best use for spring planting.

When I emptied coffee grounds on top of the soil last fall and spring, I did not include it in a compost. I did use 8 to 10 cubic feet of a peat and compost mixture in the spring that I emptied all over my garden, which is 13 by 33 feet. I turned the soil about 6-8 inches deep before planting. I’ve never had tomatoes produce so much in my four years of gardening.

How does the acid in coffee affect things? The coffee you drink is acidic, but the grounds afterward are closer to neutral on the pH scale. Some argue that they retain their acid level until combined with compost and its microbes, which neutralize it. Either way acid is great if your soil is low in it (alkaline). In the West, where I live, soils are alkaline and getting closer to neutral or increasing the acid content is a good thing for my strawberries, blueberries, raspberries and radishes. Keep in mind that you have to use quite a bit of grounds to make any real difference in the pH scale.

Coffee grounds have other benefits aside from being a fertilizer. They boost the heat in soil better than most composting materials, including manure. These high temperatures kill seeds from weeds or vegetables that may have made their way into the compost pile. If you are thinking about raised beds, consider lining the bottom edges with coffee grounds to prevent weeds from sneaking in.

Other benefits to using coffee grounds in the garden include its ability to attract earthworms, thereby improving soil structure. It even keeps cats from pooping in your garden. (Our neighborhood stray poops along the outside of the garden instead!) If tomato blight is a concern, there are some who think the copper in coffee grounds keeps this at bay.

Coffee grounds are also good at keeping away pests for both inside plants and outside flowers, like hostas, roses, lilies, peonies or those grown from bulbs. The caffeine discourages slugs and snails. You can add about 2 cups of grounds to a 5 gallon jug of water and let it steep overnight. Use it to water plants and don’t be afraid to water the leaves, too.

So whether or not coffee grounds include enough nitrogen to be used as a fertilizer, its pest deterrent qualities and attraction to earthworms has more than sold me on its benefits. If you aren’t a coffee drinker, just ask your local coffee shop if you can have their leftover grounds. It not only helps them dispose of waste, but it also helps create a more abundant, inexpensive and organic garden.

Posted on

Herb Garden Kit – Indoor Kitchen Herb Garden

Herb Garden Kit - Indoor Kitchen Herb Garden

Creating a thriving herb garden in your kitchen is more than just a way to add fresh flavor to meals. It’s an invitation to bring the beauty and aroma of the garden inside your home. An indoor herb garden kit offers an easy way to get started. It simplifies planting, saves space, and makes fresh herbs available year-round. Whether you live in a house with limited outdoor space or an apartment with no garden at all, these kits are perfect for anyone who wants to grow fresh, aromatic herbs without the hassle.


Why Indoor Herb Garden Kits Are So Popular

Fresh Herbs at Your Fingertips

Cooking becomes more exciting when you can pinch fresh basil or snip parsley straight into your dish. You don’t need to rush to the store or settle for dried herbs. The garden is right on your countertop.

Year-Round Greenery

Unlike outdoor gardens that rely on warm weather, indoor kits allow you to grow all year long. Rain or shine, summer or winter, your herbs keep thriving.

Space-Saving and Simple

Even if your kitchen is small, herb garden kits fit neatly on windowsills or countertops. They are designed for compact spaces and often include everything you need to start growing right away.

Beginner-Friendly

No experience? No problem. These kits are ideal for beginners. They often come with soil pods, seeds, labels, and clear instructions. Anyone can plant, water, and watch their herbs sprout with ease.


What Comes in a Typical Herb Garden Kit?

Most indoor kitchen herb garden kits are thoughtfully packaged so you can start planting the moment you open the box. While each kit is different, you can usually expect these items:

  • Herb Seeds – Common options include basil, parsley, cilantro, thyme, mint, and oregano. Some kits offer specialty herbs like chives or dill.
  • Growing Containers – Small pots, biodegradable planters, or decorative jars suited for indoor use.
  • Soil or Growing Medium – Pre-measured soil disks or pellets that expand with water for clean, easy planting.
  • Plant Markers – Wooden or plastic labels to help identify each herb as it grows.
  • Instructions – Step-by-step directions that guide even first-time gardeners through setup and care.

Some premium kits may also include:

  • Self-Watering Systems – Built-in reservoirs that reduce how often you need to water.
  • LED Grow Lights – Perfect for kitchens with low sunlight.
  • Decorative Containers – Rustic wood boxes, ceramic pots, or modern metal planters to match your kitchen style.

Best Herbs to Grow Indoors

Indoor conditions favor certain herbs that thrive in pots and grow well year-round. Here are some favorites you’ll find in most kits:

Basil

Fast-growing and fragrant, basil adds a sweet, peppery flavor to salads, pasta, and pizza. It loves bright light and frequent harvesting.

Parsley

A versatile herb that grows easily indoors. Use it to garnish dishes or mix into soups and sauces.

Cilantro

Perfect for salsas, curries, and fresh salads. It prefers cooler indoor temperatures and quick harvesting.

Mint

A hardy herb that grows vigorously. Great for teas, desserts, and cocktails.

Thyme

Compact and low-maintenance, thyme offers earthy flavor perfect for roasting vegetables and meats.

Oregano

A Mediterranean favorite, oregano thrives indoors and adds bold flavor to Italian and Greek dishes.


How to Set Up Your Indoor Herb Garden Kit

Step 1: Choose the Right Location

Place your kit near a sunny window where it can receive at least 4–6 hours of light each day. A south-facing window is ideal. If natural light is limited, consider adding a small grow light.

Step 2: Prepare the Containers

Follow the kit’s instructions to set up your planters. If soil pellets are included, soak them in water until they expand. Fill your containers evenly.

Step 3: Plant the Seeds

Plant the seeds at the depth suggested in the instructions. Most herb seeds need only a shallow covering of soil. Space them evenly so each plant has room to grow.

Step 4: Water Lightly

Keep the soil moist but not soggy. Overwatering can lead to root rot, so check the soil daily and water only when it feels dry to the touch.

Step 5: Provide Light and Warmth

Place your kit where temperatures stay between 65–75°F. Herbs grow best in stable conditions with consistent light.

Step 6: Harvest Regularly

Once your herbs reach a few inches tall, begin harvesting. Snip the top leaves first to encourage fuller growth. Regular trimming keeps plants healthy and productive.


Tips for Success

  • Rotate Plants Weekly – Turning pots helps plants grow evenly toward the light.
  • Pinch Back Often – Frequent harvesting encourages bushier growth and prevents flowering.
  • Fertilize Lightly – A diluted liquid fertilizer every 4–6 weeks can boost growth.
  • Watch for Pests – Indoor herbs rarely have pests, but check leaves for small insects and treat early if needed.
  • Refresh Soil Annually – After several months, herbs may need fresh soil or repotting for continued growth.

Benefits Beyond Cooking

Growing herbs indoors is more than a kitchen convenience. It brings life, fragrance, and even stress relief to your home. Watching seeds sprout and grow can be calming. The greenery brightens your kitchen, and the scent of fresh basil or mint can lift your mood.

Indoor gardening is also a fun family activity. Children love planting seeds, watching them grow, and tasting the results. It’s a simple way to teach kids about where food comes from and encourage healthier eating.


Styles of Herb Garden Kits

Rustic Wooden Planters

These often come in farmhouse-inspired designs, perfect for cozy kitchens.

Modern Ceramic Pots

Sleek and minimalist, these fit well in contemporary spaces and make herbs look elegant on a countertop.

Hanging Herb Kits

Great for saving counter space, these hang from walls or windows and add vertical greenery.

Smart Garden Systems

High-tech kits with automated watering and grow lights. They are more expensive but nearly foolproof for busy households.


Why Choose a Kit Over DIY?

You can create your own indoor herb garden with separate pots and seeds, but kits save time and guesswork. Everything is included and sized to work together. Kits also make excellent gifts for friends, family, or anyone who enjoys cooking and gardening. They are practical, thoughtful, and fun to use.


Perfect for All Seasons and All Homes

Indoor herb garden kits work in apartments, condos, dorm rooms, and full-sized homes. You don’t need a backyard or a balcony. Even in winter, when outdoor gardens are dormant, your kitchen can stay green and fragrant.


Bringing Flavor and Freshness Inside

Fresh herbs transform meals. They add color, aroma, and vibrant flavor. With an indoor herb garden kit, you never have to settle for dried herbs again. Every pinch of basil or sprig of thyme is alive with freshness. And the best part? You grew it yourself, right in your kitchen.


A New Chapter in Your Cooking and Gardening

Bringing an herb garden into your kitchen changes how you cook and live. It turns everyday meals into something special. It connects you to nature, even in the middle of winter. And it reminds you that growing your own food can be simple and joyful.

Now is the perfect time to start. Pick a kit that suits your style, find a sunny spot, and watch your kitchen transform into a tiny indoor garden bursting with flavor.

Posted on

Wrap It Up With Herbs and Spices

It’s important to prioritize your health when you’re aiming to trim some pounds. That’s why it’s important to eat nutrient-dense foods like fruits, vegetables, herbs and spices. It’s easy to get discouraged if you’re not enjoying your weight loss food, so variety is important.

Why not try these herbs and spices wrap recipes? You’ll surely love flavorful low-calorie snacks!

Tuscan-Style Herb Tuna Wraps

What you need:

  • 2 whole grain tortillas
  • 1/2 cup light tuna, drained
  • 1/2 cup diced tomatoes
  • 1/2 cup baby spinach
  • Juice of 1/2 lemon
  • 2 tbsps. chopped fresh parsley
  • 1 tbsp. olive oil
  • Salt and pepper to taste

In a small bowl, mix together tuna, tomatoes, spinach, lemon juice, parsley, olive oil, salt and pepper. Stir until ingredients are well-blended. Divide tuna mixture among the 2 tortillas fold over to make wraps. Top with fresh spinach. Serve immediately.

Turkey and Five-Spice Lettuce Wraps

What you need:

  • 1/2 kg. lean ground turkey
  • 2 heads lettuce, leaves separated
  • 1 cup water chestnuts, chopped
  • 1 carrot, shredded
  • 1 red bell pepper, diced
  • 1/2 cup chopped fresh herbs (basil, cilantro, mint and/or chives)
  • 1/2 cup instant brown rice, cooked
  • 1/2 cup reduced sodium chicken broth
  • 2 tbsps. hoisin sauce
  • 1 tbsp. minced fresh ginger
  • 2 tsps. sesame oil
  • 1 tsp. five-spice powder
  • 1/2 tsp. salt

Heat oil over medium-high heat in a large saucepan. Add turkey and ginger then cook for 6-7 minutes until turkey is cooked through. Crumble turkey using a wooden spoon. Add cooked brown rice, water chestnuts, bell pepper, chicken broth, hoisin sauce, five-spice powder and salt. Cook for 1-2 minutes or until heated through. Remove from heat and add spoonfuls of the turkey mixture into lettuce leaves. Top with carrots and fresh herbs. Roll into wraps and secure with toothpick.

Spicy Guacamole and Bean Burrito

What you need:

  • 2 6-inch whole grain tortillas
  • 1 cup shredded romaine lettuce
  • 1/2 cup low-fat refried beans
  • 1/4 cup salsa
  • 3 tbsps. prepared guacamole
  • 1/2 jalapeno pepper, diced

Combine beans, salsa and jalapeno pepper in a small bowl. Microwave for 1-2 minutes. Arrange romaine lettuce in each flour tortilla. Top with warm bean mixture and guacamole. Roll up to make wraps. Serve immediately.

Herb Hummus Vegetarian Wraps

What you need:

  • 2 cups herbed hummus
  • 4 large collard green leaves, steamed
  • 1 cucumber, peeled and sliced into thin strips
  • 1/2 jicama, peeled and sliced into thin strips
  • 1 carrot, peeled and sliced into thin strips
  • 1 ripe avocado, sliced
  • 20 fresh basil leaves
  • 1 stalk celery, sliced into thin strips
  • 1/2 cup toasted cashews, slightly crushed
  • 1 tbsp. chopped fresh chives

Mix together cucumber, bell pepper, jicama, carrot and celery in a medium bowl until well-blended. Divide the mixture among 4 collard green leaves. Top with avocado slices, basil leaves, cashews and chives. Roll up to make wraps and secure with toothpick.

Enjoy snacking for weight loss with these fun and easy herbs and spices wrap recipes!

Posted on

Types of Basil: A Colorful Guide to This Beloved Herb

Types of Basil: A Colorful Guide to This Beloved Herb

Basil is one of the most treasured herbs in gardens and kitchens around the world. Known for its sweet aroma and rich flavor, basil transforms simple meals into something extraordinary. But basil isn’t just one plant. There are many types, each with its own flavor, color, and story. Some taste peppery, while others have hints of lemon or cinnamon. Some grow tall and bushy, while others stay compact and perfect for containers. Let’s explore the wonderful world of basil and discover which varieties might be perfect for your garden or kitchen.


Why Basil Is So Beloved

Before diving into the different types, it helps to know why basil is so popular. This herb is part of the mint family, and it grows quickly in warm weather. It thrives in gardens, raised beds, and even small pots on windowsills. Basil leaves can be eaten fresh, dried, or blended into sauces like pesto. Beyond flavor, basil also carries a sense of tradition. It has been used in Mediterranean, Asian, and African cooking for centuries, making it a truly global herb.


Sweet Basil

Sweet basil is the classic variety most people think of when they hear “basil.” It has smooth, green leaves and a sweet, slightly peppery flavor. This type is perfect for Italian dishes, especially tomato sauces, pasta, and caprese salads. Sweet basil is also the main ingredient in traditional pesto.

  • Appearance: Medium to large green leaves, slightly cupped.
  • Flavor: Sweet, mild, with a peppery edge.
  • Best Uses: Pasta, sauces, salads, pesto.

Genovese Basil

Genovese basil is a type of sweet basil but with a stronger aroma and larger leaves. It originates from the Liguria region of Italy, especially around Genoa. Chefs love it for its strong fragrance and bold flavor.

  • Appearance: Large, dark green leaves that are flat and smooth.
  • Flavor: Rich and aromatic, perfect for authentic Italian pesto.
  • Best Uses: Pesto, pizza, fresh salads.

Thai Basil

Thai basil stands out with its small, narrow leaves and purple stems. It has a distinct flavor—spicy, licorice-like, and slightly sweet. This basil holds up well in heat, making it ideal for stir-fries and soups.

  • Appearance: Purple stems with shiny, narrow green leaves.
  • Flavor: Spicy with anise and licorice notes.
  • Best Uses: Thai curries, pho, stir-fried dishes.

Holy Basil (Tulsi)

Holy basil, also known as Tulsi, is sacred in Indian culture and widely used in Ayurvedic medicine. It has a strong, clove-like flavor and is often brewed into herbal teas. Holy basil is also grown as a spiritual plant, valued for its calming energy.

  • Appearance: Green or purple leaves with a slightly fuzzy texture.
  • Flavor: Spicy, clove-like, and slightly bitter.
  • Best Uses: Herbal teas, medicinal uses, spiritual gardens.

Lemon Basil

Lemon basil offers a refreshing twist with its citrusy aroma. This variety is popular in Southeast Asian cooking, especially in dishes like Indonesian soups and salads. Its bright flavor adds a fresh kick to fish, chicken, and summer drinks.

  • Appearance: Narrow green leaves with a light, delicate texture.
  • Flavor: Fresh lemon scent and taste.
  • Best Uses: Teas, salads, fish dishes, summer marinades.

Cinnamon Basil

Cinnamon basil surprises with a warm, spicy aroma that hints at cinnamon. It pairs beautifully with fruits, baked goods, and teas. Gardeners love it not only for its flavor but also for its ornamental look, with purple stems and flowers that attract pollinators.

  • Appearance: Purple stems and veins with green leaves.
  • Flavor: Warm cinnamon spice mixed with basil sweetness.
  • Best Uses: Fruit salads, teas, baked goods, potpourri.

Greek Basil

Greek basil is a small-leaf variety that forms compact mounds, making it perfect for container gardens or decorative borders. Despite its size, it has a strong flavor and works well in Mediterranean dishes.

  • Appearance: Tiny green leaves on bushy plants.
  • Flavor: Strong, slightly peppery taste.
  • Best Uses: Mediterranean dishes, garnish, fresh salads.

African Blue Basil

African blue basil is a hybrid variety known for its striking purple stems and aromatic leaves. It’s one of the few basil types that are perennial in warm climates. While edible, it’s often grown for ornamental purposes and to attract bees.

  • Appearance: Purple-green leaves with striking flowers.
  • Flavor: Peppery and camphor-like.
  • Best Uses: Ornamental gardens, pollinator-friendly plantings, savory dishes.

Spicy Globe Basil

Spicy Globe basil forms a tidy, round mound of tiny leaves. Its compact shape makes it perfect for small spaces and container gardens. The flavor is robust and peppery, great for soups and pasta dishes.

  • Appearance: Dense, round plant with very small leaves.
  • Flavor: Strong, peppery flavor.
  • Best Uses: Soups, pasta, container gardening.

Dark Opal Basil

Dark Opal basil is stunning with its deep purple leaves and pink flowers. It adds bold color to salads and drinks while offering a milder flavor than sweet basil. Many people grow it purely for ornamental purposes.

  • Appearance: Deep purple leaves with pink flowers.
  • Flavor: Mildly sweet with a hint of spice.
  • Best Uses: Salads, garnishes, infused vinegars.

Greek Columnar Basil

Greek Columnar basil grows tall and upright, almost like a column. This variety rarely flowers, which means it produces leaves for longer periods without becoming bitter. It’s perfect for cooks who want a steady supply of basil all season long.

  • Appearance: Tall, narrow plant with abundant leaves.
  • Flavor: Classic sweet basil flavor.
  • Best Uses: Everyday cooking, frequent harvesting, container gardening.

Choosing the Right Basil for You

Every type of basil brings something special to the table. If you love classic Italian dishes, sweet or Genovese basil is ideal. For Asian-inspired meals, Thai or lemon basil adds authentic flavor. If you want something unique for your garden, try cinnamon or dark opal basil for their ornamental beauty. And for year-round use, Greek columnar basil offers constant harvests.


Growing Tips for All Basil Types

No matter which basil you choose, most varieties thrive under similar conditions:

  • Sunlight: At least 6 hours of direct sunlight per day.
  • Soil: Well-drained, rich in organic matter.
  • Watering: Keep soil moist but not soggy. Water at the base of the plant.
  • Harvesting: Pinch off leaves regularly to encourage bushier growth.
  • Companion Plants: Basil grows well alongside tomatoes, peppers, and oregano.

A World of Flavor in One Garden

Basil isn’t just a single flavor or look. It’s a whole family of herbs that can transform meals and brighten gardens. By planting different types, you create a living spice rack right outside your door. Each variety adds a new note to your cooking and a new splash of color to your garden beds or pots.


Bringing Fresh Flavor to Every Season

Exploring basil varieties turns gardening into an adventure. Each plant tells its own story, from sweet Italian fields to the vibrant markets of Thailand and India. By growing several kinds, we invite new flavors, aromas, and colors into our kitchens and lives. This is how basil becomes more than just an herb—it becomes a part of our daily joy in food and nature.

Posted on

Despite the Heat, Summer Gardening Can Be Rewarding

Sunpatien Compact Pink Candy

Summer is the season of vibrant blooms, juicy vegetables, and buzzing pollinators. It’s also the time when heat can test both plants and gardeners. But instead of dreading the soaring temperatures, we can use this season to grow, experiment, and savor the rewards of hard work in the garden. With the right strategies, summer gardening can be both productive and deeply enjoyable.

This guide explores practical tips, creative ideas, and inspiring approaches to make your summer garden thrive—no matter how hot it gets.


Understanding the Summer Garden Challenge

Why heat matters

High temperatures affect more than our comfort. Plants lose water faster. Soil dries out quickly. Some flowers may wilt by midday, while vegetables can bolt or stop producing. But when we understand these challenges, we can plan smarter.

Nature’s resilience

Many plants adapt beautifully to summer’s intensity. Zinnias, marigolds, peppers, and okra flourish in warm weather. Herbs like basil and oregano actually grow stronger in heat. By choosing the right varieties and caring for them wisely, we create a garden that thrives rather than struggles.


Choosing Heat-Tolerant Plants

Annuals that shine in the sun

Bright flowers bring life to summer gardens. Some of the best include:

  • Zinnias – Long-lasting color and perfect for cut flowers.
  • Marigolds – Natural pest deterrent and easy to grow from seed.
  • SunPatiens – Tolerate full sun and keep blooming through heat waves.
  • Cosmos – Feathery foliage and blooms that attract pollinators.

Vegetables that love warmth

Not every crop falters in high heat. In fact, summer is peak season for:

  • Tomatoes – Thrive in warm soil; just keep them watered.
  • Peppers – Sweet and hot varieties both do well in sun.
  • Okra – Almost thrives on neglect and loves the heat.
  • Eggplant – Needs warmth to produce firm, glossy fruits.

Herbs that never quit

Fresh herbs are the soul of summer cooking. The best choices include:

  • Basil – Loves full sun and steady moisture.
  • Oregano – Hardy and aromatic, even in dry soil.
  • Thyme – Low-growing and drought tolerant.
  • Rosemary – Thrives in containers and dry conditions.

Be Smart About Watering

Deep and less frequent

Instead of daily light watering, give plants a deep soak a few times a week. This encourages roots to grow downward, where soil stays cooler and wetter.

Morning is best

Water early in the day so leaves dry before nightfall. This reduces fungal problems and ensures plants start the day hydrated.

Mulch for moisture

A thick layer of mulch—straw, shredded leaves, or pine bark—keeps soil cool and reduces evaporation. It also suppresses weeds, which compete for water.


Protecting Plants from Extreme Heat

Provide afternoon shade

Use shade cloth, lattice, or even a strategically placed trellis to block harsh afternoon sun. This helps delicate plants like lettuce or young seedlings survive.

Group containers

Place potted plants close together. This creates a microclimate where moisture lingers and roots stay cooler.

Wind and heat barriers

Fencing, hedges, or even temporary burlap screens can reduce drying winds and scorching sun exposure.


Soil Care in Summer

Keep feeding simple

Fast-growing plants need nutrition, but summer heat can stress roots. Use slow-release fertilizers or gentle compost teas instead of heavy feeding.

Refresh mulch midseason

Mulch breaks down over time. Adding a fresh layer mid-summer replenishes moisture retention and keeps the garden tidy.

Watch for compacted soil

Water and foot traffic can harden soil in heat. Lightly aerate around perennials and vegetables to keep roots breathing.


Creative Summer Garden Ideas

Mix edibles and ornamentals

Combine tomatoes with marigolds or peppers with basil. This not only looks beautiful but also helps with pest control and pollination.

Vertical gardening for airflow

Trellises, obelisks, and cages keep vines like cucumbers and beans off the ground, improving airflow and saving space.

Evening garden spaces

Add a bench, string lights, or fragrant plants like night-blooming jasmine. Summer evenings are magical when the heat fades and the garden hums with crickets.

Pollinator havens

Plant nectar-rich flowers like coneflowers, salvia, and lantana. Hummingbirds, bees, and butterflies will reward you with constant activity.


Gardening for the Senses

Colors that pop in bright light

Hot pink zinnias, fiery orange cosmos, and golden sunflowers stay vivid under the blazing sun. Use these to create a cheerful mood.

Fragrance in the heat

Heat releases the oils in herbs and flowers. Plant lavender, basil, and rosemary near paths where brushing against them releases bursts of scent.

Tactile enjoyment

Include plants with interesting textures—lamb’s ear’s soft leaves, ornamental grasses swaying in the breeze, or rough sunflower stalks kids love to touch.


Keep Yourself Comfortable

Hydration and timing

Garden early morning or late evening. Keep water handy and wear a wide-brimmed hat. Simple adjustments protect your energy and health.

Lightweight clothing

Choose breathable fabrics like cotton or linen. Gloves prevent blisters, and sturdy shoes keep feet cool and safe.

Rest in the shade

Take breaks. Sit back and admire your work. Part of gardening’s joy is pausing to soak in what you’ve created.


Embracing Summer’s Unique Joys

Summer gardening is about abundance. Tomatoes ripen faster than you can eat them. Flowers bloom in wild profusion. Pollinators fill the air with life. Yes, the heat can be intense, but with the right choices, this season rewards us with unmatched color, flavor, and vitality.

Instead of avoiding the garden in July or August, lean into it. Choose plants that love the sun, water wisely, and create shady spots for yourself and your plants. The result is a thriving space where beauty and harvest meet in perfect harmony.


A Season Worth Celebrating

Summer asks us to slow down, work with nature, and enjoy the bounty right outside our doors. Every bloom, every ripe tomato, and every buzzing bee is proof of life’s resilience in the heat. When we adapt to the season, rather than fight it, our gardens—and our spirits—flourish.

So, step outside. Feel the warmth on your skin. And let your summer garden remind you that even in the hottest months, growth and beauty never pause.


Posted on

Garden Flowers: Annuals or Perennials?

Perennials vs. Annuals – What Are the Advantages of Each?

Choosing the right flowers for a garden can feel like standing at a crossroads. On one side are annuals, bursting with color and energy, but here for only one season. On the other are perennials, steady and reliable, returning year after year with quiet grace. Both have their own strengths. Both can transform your space in unique ways. Understanding these differences helps you plan a garden that blooms beautifully and works with your lifestyle.


Understanding the Basics

What Are Annuals?

Annuals complete their entire life cycle in a single growing season. They sprout, grow, bloom, produce seeds, and die—all within one year. If you want them again next year, you must replant.

Examples include marigolds, petunias, zinnias, impatiens, and sunflowers. These flowers are often chosen for their bold, nonstop color and quick impact.

What Are Perennials?

Perennials are plants that return year after year. Their top growth may die back in winter, but their root systems stay alive underground, ready to sprout again when spring arrives.

Examples include daylilies, coneflowers, peonies, hostas, and black-eyed Susans. These flowers are known for their long-term beauty and ability to spread and mature over time.


The Advantages of Annuals

Annual flowers offer something irresistible—instant color and flexibility. Here’s why many gardeners love them:

1. Immediate Impact

Annuals grow fast and bloom hard. Within weeks of planting, your garden is overflowing with color. This is perfect if you want instant beauty for a special event or seasonal display.

2. Long Blooming Season

Most annuals bloom from spring to the first frost. That means you get months of nonstop flowers, far longer than many perennials that bloom only for a few weeks.

3. Bold and Diverse Colors

Annuals are famous for their vibrant shades. Electric pinks, sunny yellows, deep purples—annuals make it easy to experiment with striking color combinations.

4. Great for Containers and Borders

Because annuals don’t have to survive winter, they work well in containers, hanging baskets, and edging borders. You can swap them out easily for a fresh look each year.

5. Flexibility in Design

Annuals let you reinvent your garden every season. If you love trying new themes or color palettes, annuals are the ultimate design tool.


The Advantages of Perennials

Perennials reward patience with lasting beauty and lower long-term costs. Here’s why they are a favorite for many gardeners:

1. They Come Back Every Year

Plant once, enjoy for years. Perennials return season after season, saving you the effort and expense of replanting annually.

2. Cost-Effective Over Time

While perennials often cost more upfront, they pay off in the long run. A single investment can provide beauty for decades with proper care.

3. Low Maintenance

Many perennials are hardy and resilient. Once established, they need less water, fertilizer, and care compared to annuals.

4. Naturalizing and Spreading

Perennials often grow larger and multiply over time. They can fill in empty spaces naturally, creating lush garden beds without constant replanting.

5. Seasonal Interest and Structure

Perennials add rhythm to the garden. Some bloom in spring, others in summer or fall. Their foliage, seed heads, and winter silhouettes add texture year-round.


When to Choose Annuals

Annuals are ideal when:

  • You want fast results for new beds or containers.
  • You enjoy changing your garden’s look every year.
  • You love intense, bold colors that pop in summer.
  • You need seasonal displays for holidays, weddings, or parties.
  • Your garden beds need filling between young perennials.

When to Choose Perennials

Perennials are perfect when:

  • You want long-term beauty without replanting every spring.
  • You prefer a low-maintenance garden that evolves naturally.
  • You aim to build a garden’s structure and character over time.
  • You enjoy watching plants mature and return bigger each year.
  • You want wildlife-friendly gardens—many perennials provide nectar and shelter for pollinators.

Why Not Both?

The best gardens often combine annuals and perennials. Here’s how they work together:

  • Perennials provide the backbone. Their steady presence creates structure and continuity.
  • Annuals add seasonal flair. Their bursts of color fill gaps and keep things lively.
  • Mixed beds stay dynamic. As perennials fade, annuals can carry the show until frost.

For example, a bed of daylilies (perennials) can be brightened with marigolds (annuals) in summer. When the lilies finish blooming, the marigolds keep shining until fall.


Planning Tips for a Balanced Garden

1. Start with Perennials for Structure

Plant perennials as your garden’s foundation. Choose different bloom times to ensure something is always flowering.

2. Use Annuals for Gaps and Pops of Color

Fill empty spots with annuals to create fullness and extend bloom seasons.

3. Think About Maintenance

If you prefer low effort, lean toward more perennials. If you enjoy seasonal replanting and experimenting, add more annuals.

4. Match to Your Climate

Some plants act as perennials in warm regions but as annuals in cold ones. Know your USDA hardiness zone and choose accordingly.

5. Consider Pollinators and Wildlife

Both annuals and perennials can attract bees, butterflies, and birds. Mix them for a pollinator-friendly haven.


Examples of Stunning Combinations

  • Black-Eyed Susans (Perennial) + Zinnias (Annual)
    Golden daisies paired with bright, rainbow blooms for cheerful summer beds.
  • Hostas (Perennial) + Impatiens (Annual)
    Shade-loving hostas with lush foliage paired with impatiens’ vibrant flowers.
  • Coneflowers (Perennial) + Petunias (Annual)
    Coneflowers provide height and structure, while petunias trail with soft fragrance.
  • Daylilies (Perennial) + Marigolds (Annual)
    Hardy daylilies bloom in waves, complemented by marigolds’ continuous color.

Common Mistakes to Avoid

  1. Planting Only One Type
    A garden of only annuals can be costly to replant each year. A garden of only perennials may lack color at certain times. Balance is key.
  2. Ignoring Bloom Times
    Mix early, mid, and late bloomers to ensure flowers from spring through fall.
  3. Not Considering Growth Habits
    Perennials spread and grow larger over time. Plan for their mature size to avoid crowding.
  4. Forgetting Soil and Sun Needs
    Match plants to your conditions. Full-sun annuals will struggle in shade, and vice versa.

Creating a Garden That Feels Alive

Gardening is more than planting flowers. It’s about creating a living space that grows with you. Annuals bring excitement and change. Perennials bring stability and a sense of homecoming each spring. Together, they create a garden that feels full, balanced, and alive.


A Blooming Blend for Every Gardener

Whether you lean toward the vibrant energy of annuals or the lasting charm of perennials, there’s no wrong choice. Both bring beauty and joy in their own way. The real magic happens when we mix them, letting each shine in its season. A garden that blends both is not only practical but endlessly rewarding—a space that surprises us each year and invites us back to see what blooms next.


Growing Beauty, Year After Year

Choosing between annuals and perennials doesn’t have to be a strict decision. The garden you create today can change with the seasons, just like life itself. Plant boldly. Experiment freely. And let your garden tell a story that unfolds, year after year, in living color.

Posted on

Herb Garden Ideas

herb garden ideas

As a gardener, you know how important it is to have fresh herbs on hand. You can’t just run down to your local grocery store for them when the need arises! This blog post will give you some ideas on what types of herb gardens work best in different situations. If you’re looking for an easy garden that doesn’t require much maintenance, try planting your herbs in pots with shallow soil and lots of sun exposure. Herbs like basil and thyme do well in this type of environment and they’ll grow fast too!

Herbs are a delicious and versatile ingredient that can be used in cooking or to make tea. They also have amazing health benefits, which is just one of the reasons why more people are starting their own herb gardens! With this blog post you’ll get some ideas on how to start your own herb garden. Whether it’s indoors or outside, there’s an idea for everyone! We hope you enjoy reading about these new gardening trends.

There are a plethora of herb garden ideas you can choose from that will literally spice up your life! Fresh herbs are the ultimate when it comes to cooking and many people now a days want them. What better way to enjoy fresh herbs in your kitchen than ones that are just minutes old. Herb gardens, whether yours is indoors or outdoors, are a great way to begin gardening.

Herb Potting

Potted herbs are easy to grow from cuttings or seeds, indoors or outdoors. Start with a well draining soil. Another option is starting out with self-sustainable potting mix that has been sterilized with heat. The majority of these mixes will contain peat moss. Water often until the plants become established, then reduce water to intensify the flavors. Perennial potted herbs may need an occasional root pruning to keep the plant from getting too root bound.

Fertilize once a week with a balanced liquid fertilizer. Incorporating a granular fertilizer at planting will help. Too much fertilizer can lessen the flavor by increasing the shoot mass faster than oils develop in the plant.

Raised Herb Garden Ideas

Building a raised bed for your herb garden can be as simple or as extravagant as you want it to be. Raised herb garden ideas are many and varied. This blog post will explore some of the different ways you can create a raised herb garden, as well as how to care for them. It’s time to get your gardening gloves on!

More Herb Garden Ideas

There is no deep dark secrets when it comes to growing herbs. In fact herbs are really very easy to grow and you don’t need a large space to grow them in either. Most herbs can be grown in an area no bigger than a window box. Actually a window box would be an ideal place to grow a kitchen herb garden. There is enough room to grow parsley, basil, sage, or cilantro and it can all be in a compact container just outside the kitchen door. Combine herbs with a grape vine.

Many herbs can even be grown on the window sill of a sunny window in the house. The trick is to keep the herbs picked and to start new ones before the plants start to get too woody. Basil is an excellent window plant. When growing herbs inside or out remember two things the first is herbs do not like a lot of fertilizer and most herbs like moist soil but it needs to dry quickly wet soil will do most herbs in.

How about a strawberry jar herb garden Plant the top with a tall herb such as dill and then fill in the side with creeping plants like oregano, creeping thyme, or creeping rosemary. They will grow out the sides and hang down. just remember to keep the creeping plants trimmed to keep producing new leaves. You may substitute the plant in the top with something else such as sage if you like.

When planting herbs such as cilantro and basil it is good to do succession plantings maybe about 3 weeks apart so that you will have fresh leaves throughout the growing season. Cilantro and basil will go to seed quickly if not picked often and the flowers removed.

The main thing most herbs have in common is that they do not like wet feet and really do not need fertilizer as I mentioned earlier. Fertilizer will change the growth habits of the herbs and effect it’s strength and flavor. Good soil will provide all the nutrients necessary to grow a productive herb garden. Also be careful what you plant as some herbs can become rather aggressive and take over the whole area chocking out everything else. Mint is a perfect example. Mint is very invasive so if you want to grow it I suggest that you grow mint in a container and never in the ground.

A good herb garden will pay big dividends in as your family and friends will enjoy the great taste coming out of your kitchen. You will have the satisfaction of knowing you are using fresh homegrown herbs to feed them.

Herb Garden Design Ideas

Your herb garden should be functional and attractive. If you visit other people’s gardens, it should help you with your own herb garden designs. There are several important things to decide before you plant your first herb.

Research the plants you are thinking of planting. This will help you understand what types of pests you may be attracting to your garden. Each plant’s susceptibility to stagnation and decay when it is transplanted should be another concern.

You must determine what you hope to accomplish with your design. Do you want herbs primarily for medicinal reasons, or are you planting them for seasonings in your food? You can grow herbs of both types, but you will need to plan your garden design accordingly.

How much produce do you need to harvest from the garden? Is the beauty of the garden more important than the actual produce it yields? The answers to these questions are determined by your interests, and you should design your garden with these answers in mind rather than simply duplicating another garden design you have seen.

The herb gardens of centuries past were designed for the necessary functions of life. The garden yielded plants for medicines, seasonings, and dyes. These gardens were sometimes community gardens, and had to cater to several families. Those designs might be different than yours, especially if you just want the garden for the blooms and fragrances.

The amount of space you have to dedicate to the garden will have an effect on the design. If you have plenty of space, you may choose to have every conceivable type herb you can find. However, if space is limited, the garden may be limited to a handful of varieties. The wonderful thing about herbs is the limited number of plants you will typically need for any one item.

How will your garden relate to other landscape features in your yard? Can you plant your herbs in partial shade due to existing trees and plants? What existing landscape features, if any, are you willing to change to accommodate your new garden? Will some of the plants you want to use be a stark contrast to plants that are already there? Are some herbs incompatible with your existing plants?

Where you plant may be dictated in part by the herbs you have chosen. Although some herbs can be grown in shady areas, some require full sun. Some herbs bush into plants and pretty much stay where you put them, while others shoot out runners and want to go everywhere. Keep in mind how the garden will change after you’ve planted it. Decide what changes you are willing to allow.

Don’t be afraid to alter the garden after you plant it. After your original plan is implemented, things may transpire later that make that plan obsolete, or at least not in your best interests. You can relocate plants or have them removed if your interests change.

Freely use your imagination when designing your herb garden. There is no right or wrong place to put your herbs, as long as they get enough water, required sunlight, and proper drainage. Your herb garden designs should be your own and not mandated by the wants and needs of someone else.

Posted on

Remedies from the Garden: How to Use Oregano for Antibacterial Properties

oregano garden remedies

Oregano is more than a tasty herb. It is a small green powerhouse. People across many places have used it for a long time. We use it in soups, sauces, and pizza. But we can also use it for simple care at home. Oregano holds strong plant oils. These oils can help us fight some germs on the skin and in the air. In other words, your garden can support daily well-being in a gentle way.

This guide shows you how to use oregano safely and well. We use plain steps. We work with fresh or dried leaves. We talk about infused oils, teas, steams, and simple salves. We also learn how to grow it so it stays strong. Most of all, we keep safety first. This is educational and not medical advice. If you have a serious infection, severe pain, spreading redness, trouble breathing, or a high fever, please get medical care right away. Oregano can support us, but it does not replace a professional.

Why Oregano Fights Germs: Simple Science for Daily Life

Let’s keep the science simple. Oregano leaves carry fragrant oils. Two of the key parts are carvacrol and thymol. These are natural plant compounds. They give oregano its bold smell and flavor. They also help the plant protect itself from pests and microbes. When we brew, infuse, or breathe the steam from oregano, we bring a small part of that plant defense into our daily routines.

Think of oregano as one of the “aromatic” herbs. It sits with thyme, rosemary, and mint in the same plant family. Many of these herbs share strong scents. Those scents come from essential oils in tiny leaf glands. When we crush the leaves, we release the oils. When we warm the leaves in water or oil, we invite those oils to move into the liquid. This is why a warm tea smells stronger than cold leaves in a jar.

Here is the helpful part for us. These plant oils do not like many kinds of common bacteria. Instead of letting bacteria grow freely on a surface, the oils make life harder for them. That does not mean oregano wipes out every germ. It does not replace soap, clean water, or good medical care. But it is a friendly helper. It can be part of our routine for small, everyday needs: a stuffy nose, a minor scrape, or a musty kitchen counter before we wash.

It helps to know the forms of oregano:

  • Fresh oregano: bright and soft, great for teas and steams.
  • Dried oregano: easy to store, stronger flavor, steady for infusions.
  • Oregano essential oil: very concentrated. We use it with care, in very small, well-diluted amounts on the skin. We do not drink essential oils.
  • Infused oregano oil: a gentle oil made by soaking leaves in a carrier oil. Softer than essential oil and easier for home use.
  • Oregano vinegar or honey: leaves steeped in vinegar or honey to make simple kitchen remedies.

Safety is the thread that ties this all together. Because oregano is strong, we respect it. We use low to moderate amounts. We patch-test our skin products. We keep essential oil away from eyes and from the inside of the nose or ears. If you are pregnant, nursing, caring for a baby or child, or taking daily medicines, talk with a clinician before using oregano as a remedy. That way, you and your care team stay aligned.

Everyday Uses: Teas, Steams, Rubs, and Kitchen Magic

We can fold oregano into daily life without fuss. The steps here are simple and repeatable. You do not need fancy gear. A clean jar, a small pot, a strainer, and a spoon will take you far. Instead of chasing complex recipes, we will focus on a few core methods that cover most needs.

Oregano Steam for Stuffy Airways

A steam tent is classic home care. It feels soothing and helps loosen thick mucus.

You’ll need:

  • A heat-safe bowl
  • 2 teaspoons dried oregano or a small handful of fresh leaves
  • Hot water (not boiling hard, but steaming)

Steps:

  1. Put the oregano in the bowl.
  2. Pour in the hot water.
  3. Place a towel over your head and the bowl to make a “tent.”
  4. Breathe the steam for 5–10 minutes. Keep eyes closed. Take breaks as needed.

Why it helps: Warm, moist air helps thin mucus. Oregano’s aroma supports that fresh, open feeling. But most of all, it is gentle and quick. If you feel light-headed, stop and rest. Keep kids at a distance from hot water to avoid burns.

Oregano Tea for Comfort

Oregano tea tastes bold and herbaceous. It can be soothing when you feel under the weather.

You’ll need:

  • 1–2 teaspoons dried oregano (or 2–3 teaspoons fresh) per 8 ounces of hot water

Steps:

  1. Warm your mug with a splash of hot water, then pour it out.
  2. Add oregano to the mug or a tea infuser.
  3. Pour in 8 ounces of hot water.
  4. Cover the mug with a small plate to trap steam and oils.
  5. Steep 10–15 minutes. Strain if needed.
  6. Sip warm. Add honey or lemon if you like.

Notes: Make it fresh. Drink up to 1–3 cups in a day when you feel you want support. If your stomach feels sensitive, start with a weaker brew.

Oregano Gargle for the Back of the Throat

A warm gargle reaches the places a sip does not. It is simple and fast.

You’ll need:

  • A strong oregano tea (double the amount above)
  • A pinch of sea salt (optional)

Steps:

  1. Brew the strong tea. Let it cool until warm, not hot.
  2. Add a pinch of salt if desired.
  3. Gargle for 20–30 seconds. Spit it out.
  4. Repeat 2–3 times.

When to use: After a day of talking, during seasonal shifts, or when your throat feels coated. If you see pus, have trouble swallowing, or have a high fever, seek care.

Oregano Herbal Wash or Compress for Minor Skin Support

This is for clean, minor scrapes or areas that need freshening after you wash with soap and water.

You’ll need:

  • Cooled oregano tea, freshly made

Steps:

  1. Make oregano tea as above and let it cool.
  2. After you gently wash the area with soap and water, pat dry.
  3. Soak a clean cloth in the cooled tea.
  4. Press the cloth onto the area for 5–10 minutes.
  5. Let the skin air-dry.

Important: Do not use on deep or dirty wounds. Do not use on severe burns, large areas of broken skin, or infected wounds. If redness spreads, warmth increases, or pain worsens, get medical help.

Oregano Infused Oil for a Gentle Rub

An infused oil is not the same as essential oil. It is softer and better for beginners.

You’ll need:

  • Clean, dry jar
  • Dried oregano (very important it is truly dry)
  • Olive oil or another mild carrier oil

Ratio: About 1 part dried oregano to 5 parts oil by volume.

Steps:

  1. Fill the jar halfway with dried oregano.
  2. Cover with oil, leaving 1 inch of space at the top. Stir to release bubbles.
  3. Cap the jar. Place it in a warm, shaded spot for 2–4 weeks. Shake gently every few days.
    • Faster method: Set the jar in a warm water bath (low heat) for 2–3 hours. Keep the oil below very hot temperatures. Warm, not simmering.
  4. Strain through a fine cloth into a clean bottle. Label with the date.

Use:

  • As a chest rub for a stuffy evening.
  • As a post-wash cuticle oil or foot oil after a long day.
  • As the base for a simple salve.

Shelf life: 6–12 months if stored cool and dark. If it smells “off,” compost it.

Patch test: Place a small amount on the inner forearm. Wait 24 hours. If you see redness or itch, skip skin use.

Simple Oregano Salve

A salve stays where you put it. Great for a small area.

You’ll need:

  • 1/4 cup oregano infused oil
  • 1 tablespoon beeswax pastilles (or shaved beeswax)
  • A clean tin or small jar

Steps:

  1. In a heat-safe cup, warm the infused oil and beeswax in a gentle water bath until melted.
  2. Stir and pour into the tin.
  3. Let it cool and set.
  4. Label with the date.

Use:

  • On clean, intact skin.
  • As a spot rub near the chest or on the back (not on broken skin).
  • As a nail edge balm.

Keep away from eyes and mucous membranes.

A Word on Oregano Essential Oil (Strong and Tricky)

Oregano essential oil is very concentrated. A single drop can scent a whole room. It can also irritate skin if used straight. We never apply it undiluted. We never take it by mouth. Instead, if you choose to use it, keep it rare and gentle.

Topical dilution guide (for adults):

  • Use 1 drop oregano essential oil in 2 teaspoons carrier oil. That is about a 1% dilution.
  • For a larger batch, 6 drops in 1 ounce carrier oil is similar.
  • Use only on small areas for short periods. Stop if you feel burning or see redness.

Avoid:

  • Use on children or babies.
  • Use during pregnancy or if nursing, unless a qualified clinician gives clear guidance.
  • Use near eyes, inside the nose, or in ears.

If you want a daily helper, choose infused oil or tea instead. They are kinder and easier to manage.

Oregano Honey for Sore Days

Honey can coat and soothe. Oregano adds aroma and a little herbal edge.

You’ll need:

  • A small, clean jar
  • Fresh oregano (very dry on the surface) or dried leaves
  • Raw honey

Steps:

  1. Loosely fill the jar with oregano.
  2. Cover with honey. Use a clean chopstick to release air bubbles.
  3. Cap and let it sit for 1–2 weeks. Turn the jar every day.
  4. Warm the jar gently in a water bath if the honey is too thick.

Use:

  • Stir a spoonful into warm tea.
  • Take a small spoonful to coat the throat.
  • Spread on toast with lemon zest for a bright morning.

Oregano Vinegar or Oxymel (Vinegar + Honey)

Vinegar extracts different plant parts than oil. It is a lively kitchen tonic.

You’ll need:

  • A jar, dried or wilted fresh oregano, apple cider vinegar
  • Optional: equal part honey for an oxymel

Steps:

  1. Pack the jar halfway with herb.
  2. Cover fully with vinegar (and honey if using).
  3. Cap with a non-metal lid (or place parchment under the lid).
  4. Steep 2–4 weeks. Shake often.
  5. Strain and bottle.

Use:

  • Splash into salad dressings.
  • Add to warm water as a sharp, tasty sip.
  • Use as a pre-rinse for cutting boards before washing with hot, soapy water.

Kitchen Magic: Everyday Food Is Everyday Care

Good food is the best daily remedy. Oregano fits into that plan with ease.

  • Marinades: Mix olive oil, lemon juice, garlic, oregano, and black pepper. Coat poultry or vegetables before cooking. In other words, you add flavor while you cook safely and hot.
  • Broths and soups: Add oregano in the last 10 minutes so the aroma stays bright.
  • Finishing salt: Grind dried oregano with sea salt. Sprinkle on roasted vegetables.
  • Herb butter: Soften butter and fold in oregano, parsley, and lemon zest. Use on warm bread or steamed greens.

Remember, herbs support good cooking. They do not replace proper food safety. Keep your hands, tools, and surfaces clean. Cook to safe temperatures. Chill leftovers quickly.

When Not to Use Oregano Remedies

Common sense protects us. Skip oregano remedies when:

  • The skin is badly broken, very red, streaking, or draining pus.
  • You have a high fever, severe pain, chest pain, or trouble breathing.
  • You are allergic to mint family plants (mint, basil, thyme, sage).
  • You are pregnant, nursing, or caring for infants and young children, unless a clinician agrees.
  • You take daily medicines and are unsure about interactions. Ask your care team.

Instead of pushing through with a home remedy, reach out for help when things look or feel serious. Quick care is wise care.

Grow, Harvest, and Store: Keeping Your Oregano Potent

Fresh, lively leaves make better remedies and better meals. The garden gives us that. Oregano is forgiving, tough, and generous. Once it is happy, it keeps on giving for most of the year in many regions.

Planting Basics

  • Sun: Oregano loves sun. Aim for 6–8 hours of light each day.
  • Soil: Well-drained soil is key. Sandy or loamy soil works best. Heavy clay needs added compost and grit.
  • Water: Water to help roots settle, then let the top inch of soil dry between waterings. Over-watering dulls the flavor and can invite rot.
  • Spacing: Give plants about 12–18 inches of space. Airflow matters for leaf health.
  • Containers: A pot 10–12 inches wide with drainage holes is perfect. Use a light potting mix. Add a bit of perlite for extra drainage.

Strong Starts

You can grow oregano from seed, but starts are easier. Plant after the last frost. If you live in a mild climate, you can plant almost any time. Oregano is a perennial in many places. It comes back year after year. Trim it back in late winter or early spring to keep it bushy.

Feeding and Care

  • Fertilizer: Go light. Too much fertilizer makes lanky plants with weak flavor. A little compost in spring is enough.
  • Pinch and harvest: Pinch the tips often. This keeps the plant dense and leafy.
  • Flowering: When oregano flowers, it is pretty and feeds pollinators. But leaves may taste milder. Harvest more before full bloom if you want strong flavor.

Harvest Timing

Harvest on a dry morning after the dew has lifted. The oils are highest then. Use clean scissors. Cut above a leaf node to encourage new growth. Take just a third of the plant at a time so it can recover.

Drying for Later

Dry leaves hold flavor and aroma for months when stored well.

  • Air-dry: Tie small bundles and hang in a warm, shaded, airy place. Or lay leaves on screens.
  • Dehydrator: Use the lowest setting to protect aroma.
  • Test: Leaves are ready when they crumble easily.
  • Store: Keep in clean glass jars away from light and heat. Label with the date. Dried oregano stays lively for about a year if stored well.

Making Potent Infusions from Garden Cuts

Right after harvest, you can turn your bounty into remedies:

  • Fresh tea: Rinse leaves, pat dry, and brew at once.
  • Infused oil: Use fully dried leaves to prevent spoilage. If you want to use fresh leaves, wilt them for 24 hours, then infuse gently and refrigerate the finished oil.
  • Vinegar or honey: Fresh is great here. Just make sure leaves are dry on the surface to keep water out of the jar.

Clean Tools, Clean Jars, Clean Work

Clean tools matter. Wash your jars with hot, soapy water. Let them air-dry. Wipe counters. Use fresh spoons for tasting. In other words, the way you prepare your remedies shapes their safety.

Label and Track

Write down the date, the plant part, and the method. Example: “Oregano infused oil, 1:5, olive, 9/1.” This tiny habit helps you learn. After more than a season, you see what you use fastest and what holds up best. You waste less. You gain skill and confidence.

Shelf Life at a Glance

  • Fresh tea: Same day is best.
  • Gargle: 24 hours in the fridge, then discard.
  • Infused oil: 6–12 months in a cool, dark place.
  • Salve: About 1 year.
  • Honey infusion: Up to 1 year (use clean, dry spoons).
  • Vinegar or oxymel: 1–2 years.

If the smell turns sour (and it should not for oil), if mold appears, or if color or texture changes oddly, compost it. Start again with fresh, clean supplies.

Mediterranean, Greek, and Mexican “Oregano”

You may see different kinds of oregano at shops or nurseries.

  • Mediterranean or common oregano (Origanum vulgare): Classic pizza herb.
  • Greek oregano (Origanum vulgare subsp. hirtum): Often stronger, with a sharp, bright bite. Great for marinades and teas.
  • Mexican “oregano” (Lippia graveolens): Not the same plant family, but a beloved culinary herb with citrusy notes. Common in Latin American cooking.

All are fragrant and useful in the kitchen. For remedies, stick with what you grow and know. Taste and smell guide you. If the leaves are bold and lively, they will likely make a good tea or infusion.

Pairing Oregano with Friendly Allies

We can blend herbs for balance.

  • Thyme: Pairs well in teas and steams for the same reasons oregano works.
  • Sage: Lovely as a gargle blend.
  • Rosemary: Excellent in infused oils for a bright, clean aroma.
  • Lemon peel: Adds freshness to teas and oxymels.
  • Honey and ginger: Comforting partners for chilly days.

Use small amounts and keep blends simple. Two or three herbs are enough. Simple blends are easier to track and adjust.

Gentle Routine, Realistic Goals

It helps to set clear goals. We are not trying to “cure” big problems at home. Instead, we support comfort, cleanliness, and calm. We use oregano to freshen the air, warm the chest, coat a scratchy throat, and care for clean, minor skin spots. We also cook with it. We make our daily meals richer and brighter. Instead of grabbing a bottle first, we start with the garden and the kitchen. But most of all, we listen to our bodies. If something feels wrong, we ask for help.

For Kids, Pets, and Sensitive Folks

  • Kids: Skip essential oil. Use mild tea steam in the room, not a close tent. For older kids, a light tea may be okay. Talk with a clinician if unsure.
  • Pets: Many essential oils are not safe for pets. Keep oils and strong aromas away from them.
  • Sensitive skin: Use infused oil rather than essential oil. Dilute more. Patch-test every time.

A little caution protects the people and animals we love.

Your Oregano Kit: A Short Checklist

Keep this small set on hand:

  • A jar of dried oregano
  • A bottle of oregano infused oil
  • A small tin of oregano salve
  • A bottle of oregano vinegar or oxymel
  • Fresh oregano growing in a pot or a garden bed

With this kit, you can make tea, steam, gargle, rub, and dress salads or soups. You are ready for many small, everyday needs.

Quick Troubleshooting

  • My tea tastes too strong. Use less oregano or shorten the steep time.
  • My infused oil smells “grassy.” You may have overheated it. Try a slower, cooler method next time.
  • My salve is too hard. Re-melt and add a teaspoon more oil.
  • My vinegar lid rusted. Use plastic, glass, wood, or line a metal lid with parchment.
  • My skin feels warm after a rub. Stop and wash the area with mild soap. Dilute more next time or switch to a different herb.

Green Wisdom We Carry Forward

Oregano meets us where we live. It grows in a sunny patch or a patio pot. It fills our kitchen with scent and our plates with flavor. And when we need gentle support, it steps in. A warm steam to open a tight chest. A mild tea to soothe. A simple rub to freshen the skin after washing and care. In other words, this humble herb helps us care for ourselves in small, steady ways.

We do not ask oregano to do what it cannot do. We still wash our hands, clean our tools, and cook our food well. We still call a clinician when things look serious. But most of all, we keep learning. We listen to our bodies. We pay attention to the plants we grow. After more than a season with oregano, you will know its scent, its timing, and its strengths. You will harvest with joy. You will make clean jars of oil and vinegar with pride. You will brew tea with a calm hand.

That is the heart of garden remedies. Simple steps. Honest limits. Steady practice. As we move through the year, let’s keep oregano close. We can breathe its bright scent, taste its bold leaf, and trust that our daily care is adding up. One cup. One rub. One harvest at a time.