If you’re like most gardeners, you probably consider August to be the tail end of the growing season. The truth of the matter is that it’s a great time to start your fall garden.
A fall garden can produce excellent vegetables and extend your crops long after your spring planted garden is finished. The vegetables you harvest from the fall garden are often sweeter and milder than those grown over the summer.
What type of vegetable plants you plant in your fall garden will depend on the space you have, as well as the types of vegetables you like. Be sure that you plant vegetables with the shortest growing season, this will increase the chances they will be full grown and harvested before the hard frost sets in. Starting your seeds indoors the first week of July will also give you a good head start.
Most seed packages will be labeled “early season”, or you can find the seeds that are labeled with the fewest days to harvest. Since seeds are not usually kept in stock towards the end of summer, you will probably need to purchase seeds for your fall garden in the spring. You can also find them easily online.
Even vegetables that like the heat of summer, like tomatoes, sweet potatoes, and peppers, will produce nicely until harder frosts hit, which can be fairly late in the year in certain areas.
There are certain vegetable plants that normally stop producing towards the end of summer. These include snap-beans, summer squash, and cucumbers. Even these, if planted in the middle of summer, can produce nicely until the first frosts arrive. Many hardy vegetables will grow with temperatures as low as 20 degrees.
If you have root plants such as beets, carrots or radishes, that have the tops killed by a freeze, you can save them by applying a heavy layer of mulch.
For fall gardening you need to know approximately when the first hard frost normally hits your particular area. The Farmer’s Almanac is a great resource for this type of information. It will give you specific dates and is fairly accurate most of the time. You also need to know approximately how long your plants will take to mature. As I said, this is available by reading the individual seed packets.
To prepare the soil for your fall garden, the first thing you will need to do is clear out leftover summer crops and weeds. If you leave the leftover vines and plant debris from your summer crops, bacteria and diseases can develop from these leftover remnants. If your spring plants were not fertilized heavily, you may want to spread a few inches of compost over the garden next.
Once that is done you will need to till the soil and wet it down. Now simply wait 24 hours and your ready to plant.
All too often gardeners will shy away from planting a fall garden, to avoid dealing with frosts. I can tell you from experience that sturdy and healthy vegetables can stand up to a few frosty nights, while producing wonderfully tasting produce.
Fall gardening is not for everyone, but why not give it a try? It can provide you with the opportunity to enjoy garden fresh vegetables for a little while longer each year.
We all have a garden planter or two dotted around our gardens, perhaps filled with a specimen plant or a seasonal display. But there is a lot to be said for using containers as the design basis for creating a garden. Containers are probably one of the most versatile forms of gardening, allowing you not only to choose type of container but also the plant and its location. There are many advantages to container gardening. You can move your containers to different locations within your garden, thereby creating an instantly different effect. You can change planting displays as often as you like, perhaps making the most of the choice of different seasonal plants. You can also grow plants which like different soil types to your own by simply filling them with the right type of compost.
There are an ever increasing number of different types of container you can buy, with materials and designs to suit every climate and different tastes. Pots and tubs are probably the most popular type of planter available. They are for the most part versatile and easily moved to different positions in the garden. Pots and tubs come in an enormous variety of sizes and designs, both traditional and modern. Materials vary from moss covered terracotta and artificially aged stone planters, to reused car tires and fiber glass. There are no rules when it comes to choosing a type of container and there is no reason why you can’t combine traditional with modern. Just be aware that your designs and materials complement each other in some way.
Pots and tubs are equally as versatile when it comes to planting. You can grow almost anything you like in a container. Formally clipped box and other evergreens look stunning as focal points, as do specimen standard plants such as bay trees. Group a number of planters of different sizes together with a plant type such as herbs. A particularly stunning planter can be filled with seasonal annuals for an all year round display.
Window boxes are another great way to grow plants and enhance the appearance of your house and garden. Window boxes are particularly useful if you have a tiny garden or even if you have no garden at all! You can buy ready- made window boxes, have them made bespoke to your requirements or simply make your own. Window boxes don’t have to be made of wood. I have seen some beautifully aged metal ones as well as reconstituted stone ground-level boxes. Grow seasonal displays or plant up a box outside your kitchen window with herbs or easy to grow edibles like lettuce.
Hanging baskets are probably the most versatile of all containers. They can be hung on walls, fences and even in trees. Not only can your display be changed from season to season, but you can also grow edible plants such as tumbling tomatoes and strawberries and even a selection of herbs, hung near your kitchen door. Hanging baskets also come in a variety of shapes and sizes. More traditionally made from wicker, but I have seen some great modern alternatives made from brightly colored plastics.
Troughs and sinks can be used to create mini container gardens in one place. Although strictly speaking you can grow anything you like in a trough shaped planter, the lack of depth makes them more suited to growing alpines and herbs. Stone troughs probably look the best in any garden but why not also think about getting hold of an old Belfast sink which looks particularly effective when planted with herbs under a kitchen window.
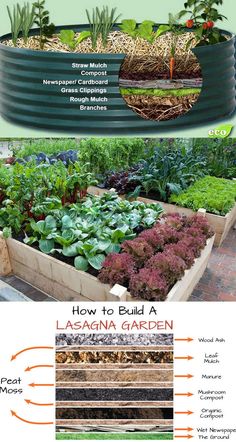
Another type of container not readily thought about is the raised bed. Raised beds are a great way of growing both vegetables and garden plants. They are easy to maintain and therefore popular with gardeners with impaired mobility. They are also an easy way of adding structure to an otherwise flat garden space, lifting plants higher up and creating the illusion of different levels to a garden.
Some Container Planting Rules
If you are going to maintain a healthy container garden, there are a few rules you will need to follow whatever type of planter. Drainage is all important for container grown plants. Make sure your container has adequate drainage holes and always add some broken pot or crocks to the bottom of the planter to aid drainage. If your container is to be placed on a hard surface, sit it on some feet to raise it above ground level slightly. Use the right type of compost. Try not to overcrowd your container, most plants will need plenty of room to spread their roots and grow into healthy specimens. Conversely, don’t let your plants become pot-bound. Although there are a few plants which do well in these conditions, as a rule, either divide you plant or re-pot it into a larger container.
In extremely cold weather both your containers and their plants will need some protection. For those that are not frost hardy it is probably best to over winter them into a cold greenhouse. Others can be wrapped in straw or fleece to protect them from frost.
Perhaps the most important consideration of all for container grown plants is water. During dry weather in the summer months you will have to make sure your pots are well watered. Materials like terracotta dry out quickly as the clay absorbs water, so you will often find yourself having to water at least twice a day. Early morning and evening is best. During the winter water container plants sparingly. Waterlogged containers easily freeze killing the roots of the plants in them.
I am a firm believer that a garden reflects some of the personality of the gardener who tends it. Garden planters are a great way of putting your stamp on a garden, particularly if you are a little bit quirky! I have seen old wooden boats used as planters, odd worn out walking boots, pan tiles, antique wash tubs, old car tires and even a disused toilet!
Reusing Plastic Containers and Planters
Anyone who has a garden or ever got a potted plant has had to deal with those seemingly useless plastic pots. Most people throw them out. I save them until they crumble-re-using over and over again. They can be the “greenest” item in your garden that save you the most green.
I have a very small gardening space including containers but big or small practical ways maybe “green” now but will always make sense far after being GREEN loses fashion.
So what to do with all those unsightly plastic pots? Whether you have an established garden or just starting out; when you buy plants you will have to deal with re-using or disposing of them.
Plastic pots have an endless amount of uses in the garden. So before you just think re-cycle re-think they can save you money before tossing them out:
• Seeds eventually become seedlings needing a larger pot; having pots on hand is both convenient and cost-saving.
• Small pots make excellent large pot fillers. Place a small pot upside down in a larger one then fill with soil and plant. Container is lighter with less soil used.
• Instead of throwing out the cell flats, crumble up and use as a large container filler too. [Or wash and use as packing material.]
• Place invasive plants inside of the pot then plant in the ground for keeping them in-check.
• Have too many plants? Bought too many? Divide both annuals and perennials using pots to share plants. Don’t have to worry about loaning out your expensive ones.
• Don’t have drainage holes in that pretty container? Put plant in a plastic pot then place inside the prettier one. [Don’t forget to pour out any excess water.]
• Wish you could afford more expensive containers? Take plastic pots, spray paint assorted colors then add decorative ribbons, beads or sphagnum moss to make appealing.
• Don’t like to water? Plastic holds moisture longer so use instead of terra cotta [I still recommend terra cotta for herbs in almost all instances.] Works for indoor/outdoor plants.
• Just planted a new plant? Use plastic container as a cloche or shield to protect until established.
• Threat of frost? Use containers to cover tender plants. Use 2 pots together to block out holes and create a better insulator.
• Weeding. Keep containers around as receptacles when pulling them out.
• Use to make compost or save potting soil.
• Use small pots as scoops for mulch, fertilizer, etc.
• Use to prop up other containers to create different plant levels.
• Use to hold garden tools.
• Plant below ground level then put smaller pots filled with annuals for easy change-ups.
• Storing bulbs or use for overwintering plants.
As you can see the possibilities are endless. These are the pots that cost nothing but continue to save you money over and over again. $$$$$. How Green is that?
5 Gallon Buckets in the Garden
Continuing the discussion of how important the often underestimated 5 gallon buckets at home, we are now revealing how we can make the best use of these pails in the garden.
As pots
Although the appearance of the 5 gallon pails may not look as charming as the real gardening pots, they are highly functional and cheaper. Good quality 5 gallon buckets cost between $ 3 and $ 6; which is nothing compared to gardening pots’ price. With some little preparation, the pails can be turned into flower pots instantly.
All you have to do is to drill the bottom of the 5 gallon buckets with ½ or ¼-inch holes to allow water drainage. 10 to 15 holes are enough for 5 gallon pails. Next is to fill in the buckets with good quality potting soil and fertilizer. It is now ready to be planted.
If you care about upgrading the look of the modest 5 gallon pails, you may want to put more time before filling in with soil. Get some paint with the color you like, paint the pails, give some accents with different colors of paint, and dry it completely. Remember to paint only on the outer side for vegetables and herbs gardening. You don’t want the vegetables you grow to take the chemical substance of the paint since you will be eating them later.
Another advantage of having 5 gallon buckets garden is that it is extremely practical. You can move the pots wherever and whenever you want. If the growing season is over, you can pile them up and store the soil for the next gardening season, or you can just move them indoor if the plant thrives to survive there. The 5 gallon buckets also make it more difficult for animals like rabbits to destroy your plants.
Now you have not only a cheap way to grow your herbs and plants, but also creative and practical ways too.
As compost containers
Compost plays an important role in the life of a plant. Good homemade compost even plays more important role in the environment. Oddly enough, your plastic 5 gallon pails can help make this happen. As the container of compost making.
First of all, you should drill ¼-inch holes around the sides of the bucket. This will allow air circulation and water drainage. Line the bottom of the pail with dry leaves and soil. After that, dump your table scraps like vegetables, napkins, eggshells, coffee grounds or tea bags inside the bucket. Avoid milk and meaty stuff since this could attract vermin. Cover again with dry plant debris and soil. Do one dry layer after the wet one continuously and wait until the 5 gallon pail is filled up. Have a lid to close the pail and let the microorganisms work the compost. Check it out from time to time whether it is too dry or too wet. If it is too dry, add some water and move it to a shadier place. If it is too wet, place it under the sun to dry a little bit. This process takes from several weeks to months to complete.
The better pails to use for homemade composting are the ones in dark colors. Black will be the best. It will absorb more heat for the microorganisms to live under the shade.
If you use 5 gallon buckets in your garden for those purposes mentioned above, you will definitely promote an environment friendly gardening and at the same time save money for a better use at home.
First, what makes up brewed coffee, besides caffeine? Nutrition experts agree that coffee grounds contain magnesium, phosphorus, potassium, copper, manganese and trace amounts of calcium. Nitrogen, phosphorus and potassium are the ingredients necessary for garden soil. They coincide with the figures you see on most garden fertilizer bags. So coffee does have what plants need to grow.
There seems to be some debate about whether or not coffee produces nitrogen. Most agree that coffee grounds contain 1.5 to 2.2% nitrogen. However, some feel that the nitrogen is not available to the soil or the plants until the grounds themselves begin to decompose.
Others say you must compost the coffee grounds with other plants to release the nitrogen in the decomposition process. They recommend adding nitrogen to the soil if using only the grounds. The rotting grounds attract nitrogen-consuming microbes, thus, the need to add nitrogen if using only coffee grounds as a fertilizer.
So to be on the safe side where fertilizing is concerned, you may be better off tossing your coffee grounds along with other compost into the garden in the fall and winter to allow them time to be of best use for spring planting.
When I emptied coffee grounds on top of the soil last fall and spring, I did not include it in a compost. I did use 8 to 10 cubic feet of a peat and compost mixture in the spring that I emptied all over my garden, which is 13 by 33 feet. I turned the soil about 6-8 inches deep before planting. I’ve never had tomatoes produce so much in my four years of gardening.
How does the acid in coffee affect things? The coffee you drink is acidic, but the grounds afterward are closer to neutral on the pH scale. Some argue that they retain their acid level until combined with compost and its microbes, which neutralize it. Either way acid is great if your soil is low in it (alkaline). In the West, where I live, soils are alkaline and getting closer to neutral or increasing the acid content is a good thing for my strawberries, blueberries, raspberries and radishes. Keep in mind that you have to use quite a bit of grounds to make any real difference in the pH scale.
Coffee grounds have other benefits aside from being a fertilizer. They boost the heat in soil better than most composting materials, including manure. These high temperatures kill seeds from weeds or vegetables that may have made their way into the compost pile. If you are thinking about raised beds, consider lining the bottom edges with coffee grounds to prevent weeds from sneaking in.
Other benefits to using coffee grounds in the garden include its ability to attract earthworms, thereby improving soil structure. It even keeps cats from pooping in your garden. (Our neighborhood stray poops along the outside of the garden instead!) If tomato blight is a concern, there are some who think the copper in coffee grounds keeps this at bay.
Coffee grounds are also good at keeping away pests for both inside plants and outside flowers, like hostas, roses, lilies, peonies or those grown from bulbs. The caffeine discourages slugs and snails. You can add about 2 cups of grounds to a 5 gallon jug of water and let it steep overnight. Use it to water plants and don’t be afraid to water the leaves, too.
So whether or not coffee grounds include enough nitrogen to be used as a fertilizer, its pest deterrent qualities and attraction to earthworms has more than sold me on its benefits. If you aren’t a coffee drinker, just ask your local coffee shop if you can have their leftover grounds. It not only helps them dispose of waste, but it also helps create a more abundant, inexpensive and organic garden.