Posted on

Benefits of Raised Garden Beds

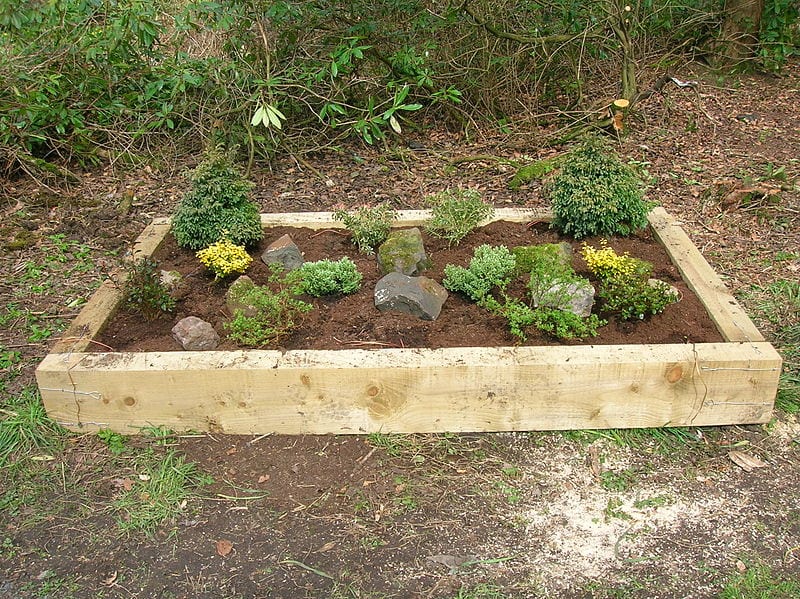
raised garden bed

Raised garden beds, also known as garden boxes, are a type of gardening structure that elevates the planting area above the ground level. They are typically made from various materials like wood, metal, or stone and are designed to contain soil within a confined space. Raised garden beds have gained popularity among gardeners because they offer several benefits:

  1. Improved soil drainage: Raised beds allow for better drainage, which can help prevent waterlogged plants and root rot.
  2. Easier soil amendments: It’s simpler to add and control the soil mixture in a raised bed, allowing gardeners to create the perfect environment for their plants.
  3. Reduced soil compaction: Since gardeners don’t walk on the soil in raised beds, it remains less compacted, improving root growth and overall plant health.
  4. Accessibility: Raised beds can be built at different heights, making them more accessible to gardeners with mobility issues or those who prefer not to bend down.
  5. Pest control: Raised beds can help deter some pests, such as slugs and snails, by creating a barrier between the ground and the plants. They can also make it easier to add netting or fencing to protect plants from larger animals.
  6. Extended growing season: The soil in raised beds tends to warm up faster in the spring, allowing for earlier planting and a longer growing season.
  7. Aesthetic appeal: Raised beds can be an attractive addition to a garden, offering a clean, organized appearance and the opportunity for creative design.
  8. Weed management: Separating the garden bed from the surrounding soil can help minimize weed growth, making maintenance easier.

Overall, raised garden beds are a practical and versatile option for gardeners looking to improve their growing conditions and make gardening more enjoyable.

raised garden bed

How to Build a Simple Wooden Raised Garden Bed

Building a raised garden bed is a relatively simple project that can be completed in a few steps. Here’s a basic guide to help you get started:

Materials you’ll need:

  • Untreated wood, stone, concrete blocks, or metal (for the frame)
  • Wood screws or brackets (for wood frames)
  • Drill or screwdriver
  • Saw (if you need to cut wood)
  • Level
  • Landscape fabric or cardboard (optional)
  • Soil mix (compost, topsoil, and other amendments as needed)
  • Plants or seeds

Step-by-step guide:

  1. Choose a location: Select a level, well-draining area that receives the appropriate amount of sunlight for the plants you intend to grow. Make sure the location has easy access to water.
  2. Determine the size: Decide on the dimensions of your raised bed, considering both the space available and the types of plants you’ll be growing. Common sizes are 4×4, 4×8, or 4×12 feet. The width should be no more than 4 feet, allowing you to easily reach the center of the bed from either side.
  3. Select the material: Choose the material for your raised bed frame. Untreated wood (such as cedar or redwood) is a popular choice due to its natural resistance to rot and insects. Other options include stone, concrete blocks, or metal.
  4. Build the frame: Cut the material to the desired length and assemble the frame using screws, brackets, or other appropriate fasteners. For a wooden frame, you can use wood screws and a drill or screwdriver to connect the corners. Ensure that the frame is square and level.
  5. Prepare the ground: Remove any grass, weeds, or rocks from the area where you’ll place the raised bed. You can lay down landscape fabric or cardboard to help suppress weeds, but make sure to leave openings for water drainage.
  6. Position the frame: Place the frame in the prepared area, ensuring that it’s level and secure. If necessary, adjust the ground underneath the frame to achieve a level surface.
  7. Fill the bed: Add a mix of high-quality soil and compost to fill the raised bed. You may also need to add other amendments, depending on the specific needs of your plants. Fill the bed to about 1-2 inches below the top edge of the frame.
  8. Plant your garden: Plant your seeds or seedlings according to their specific requirements for spacing, depth, and care. Water the bed thoroughly after planting to help settle the soil.
  9. Maintain your garden: Regularly water, weed, and fertilize your raised garden bed as needed to ensure optimal plant growth.

Remember that building a raised garden bed is a customizable project, so you can adjust the design, materials, and size to suit your needs and preferences.

Filling a Raised Garden Bed

Protect against pests by lining the bottom of the bed with weed block, newspaper, cardboard or landscape fabric. Fill your beds with the best soil possible. For most applications, a good basic mix is made from 60-percent topsoil, 30-percent compost and 10-percent potting mix. Add enough soil mix to fill the bed. Some settling will occur. And beware of adding anything to your beds that may contain weed seeds or herbicide chemicals.

Raised Bed Gardening Triumphs Over Poor Soil Conditions

Raised bed gardening is the key to success when it comes to having healthy, thriving plants. It takes care of your soil problems and you can even use a raised bed for growing flowers and vegetables! A successful gardener should consider this method if they live in an area that has poor quality dirt-especially ones with sandy soils or heavy clay soils.

What’s the best way to garden? With raised beds! They’re so much easier than digging up dirt and planting your seeds or seedlings, plus they make a beautiful display. Whether you have an acre of land that needs attention or just one little plot in shades salad bowl type area – this is perfect for all sorts o’ spaces (and pockets too).

The ability to manage the soil is one of the most significant benefits of using the raised bed. Because you choose and mix the ground yourself, you can create the perfect soil environment for the plants you want to grow. That means even if you’re going to grow plants that don’t typically thrive in your area because of your local soil composition, you can grow them in raised planters in which you have created the perfect soil for those plants. The benefits of using raised beds extend beyond just the soil environment. Raised bed gardening allows you to create your own mix for perfect plant growth, even if local conditions don’t typically support that type or variety!

There are other benefits to raised areas as well, even if the soil is not an issue in your area. Another significant advantage to consider is the way the raised beds let you target the use of things you put on your garden. Apply fertilizer and mulch where they are needed – and there only – so you end up using less and do not accidentally apply these things where they are not required. If you use chemical pesticides, herbicides or insecticides, you can use a smaller amount of them, and again, you can target their use. Because you apply them only to the raised bed, you don’t have to worry about runoff or the effects these chemicals can have on your pets or kids who play in your yard. All in raised bed gardening makes for more efficient planting.

One great benefit of a raised gardening bed that is the fact that the planting area is, in fact, elevated. Since the garden is not ground level, it is much easier to tend. Garden enthusiasts with back problems will love being able to see their plants and manage them without bending over and dealing with hours of painful work. Raised areas are ideal for people with joint pain and injuries that make it difficult for them to garden traditionally.

Although raised garden beds have all of these benefits and make different kinds of gardening possible in areas where the soil is not ideal, the beds can’t trump every problem a garden may face. You still need to consider the climate in your area and choose plants accordingly – raised planters or not, and tropical plants won’t grow in snowy climates. Also, you will still need to pay attention to what level of sunlight your garden area gets and choose your plants with that in mind. Further, although most people with raised beds deal with less pest infestation, you will still need some way to deal plant-munching insects. Even though raised beds can’t fix everything, however, they are still a great option when soil limits the way you garden.

Final 3 Tips For Building a Raised Bed Garden

Raised bed gardening is a fun, creative, and efficient way to garden. If you are just getting started with this type of gardening, here are a couple tips to get you going in the right direction.

Tip #1 – To Purchase a Kit or Not?

There are many ready made kits on the market now to make building your bed quick, easy, and affordable. If you choose this route, do some research as some will vary in quality and features, not to mention in ease of assembly.

Tip #2 – Building Your Own

If you decide to build your own bed be sure you know the weight of the bed you intend to build once it has soil in it. The bigger the bed, the heavier it is with soil, and the more reinforcement you will need. If need be rebar can be placed at angles to the bed once assembled to give it side support, this is important in larger beds.

Tips #3 – Consider Size

When trying to decide what size to make your raised bed, be sure to consider what types of vegetables you will be planting. A 12 inch raised bed is sufficient for most root vegetables, lettuce and other leafy greens need even less space.

Raised bed gardening can be a great way to create a garden when space is limited. It is a fun, efficient, and easy to maintain way to exercise your green thumb. Hopefully these couple of tips will get you started on your own garden today.

Posted on

The Fascinating Monstera Plant: A Guide to Care and Cultivation

variegated monstera

Monstera, commonly known as the Swiss cheese plant or simply Monstera, is a popular and easy-to-grow tropical houseplant known for its distinctive large, perforated leaves. This guide will walk you through the care and cultivation of this fascinating plant.

Monstera plants are popular houseplants because they’re relatively easy to care for and they can tolerate a wide range of light levels, from low light to bright indirect light. They’re also very forgiving if you forget to water them occasionally! Two different species of Monstera are cultivated as houseplants – Monstera deliciosa and Monstera adansonii.

Read on to learn everything you need to know about caring for your own monstera plant.

Light & Temperature

Monsteras prefer bright, indirect light. Too much direct sunlight can scorch the leaves, while too little light can result in weak, leggy growth. Place your plant near a well-lit window, but away from direct sunlight.

As tropical plants, Monsteras thrive in humid environments. Keep the humidity level around 60% or higher by using a humidifier, misting the plant, or placing a tray of water near the plant. The ideal temperature range for Monsteras is 65-85°F (18-29°C). Keep the plant away from cold drafts, air conditioners, or heaters.

Watering & Soil

Water your Monstera when the top inch or two of soil feels dry to the touch. Overwatering can lead to root rot, while underwatering can cause the leaves to yellow and wilt. Reduce watering in the winter months when the plant’s growth slows down.

Monstera plants prefer well-draining soil. Use a high-quality potting mix with added perlite or orchid bark to improve drainage. Choose a pot with drainage holes to prevent root rot. As Monstera plants grow rapidly, repotting may be necessary every 1-2 years to accommodate the plant’s expanding root system.

Fertilizing Monstera Plants

Fertilize your Monstera with a balanced liquid houseplant fertilizer every 4-6 weeks during the growing season (spring and summer). Reduce the frequency to once every 8-12 weeks during the fall and winter months.

Cleaning Your Monstera Plant

As with any indoor plant, it’s important to clean your monstera regularly to remove any dust that has accumulated on its leaves. Use a soft cloth or sponge and wipe down each leaf, being careful not harm the delicate leaf tissue. You can also mist your monstera leaves with clean water on a regular basis to help keep them clean and free of dust.

Prune your Monstera to maintain its shape and size, as well as to promote bushier growth. Use clean, sharp scissors to remove any yellow or damaged leaves, as well as any aerial roots that are not attaching to a support.

As Monstera plants mature, their large leaves and climbing growth habit may require additional support. Use a moss pole, trellis, or other sturdy structure to provide your plant with the support it needs.

Monstera plants make beautiful, easy-to-care-for houseplants that can thrive in a wide range of homes and office environments. These tropical natives prefer warm temperatures and high humidity levels, so if you can provide those conditions for your plant it will reward you with large, striking leaves that add interest and visual appeal to any space.

Shop for Monstera Plants

The Many Benefits of Monstera Plants

Many people are familiar with monstera plants, also known as Swiss cheese plants, due to their large leaves with distinctive holes. These tropical plants are native to Central and South America and thrive in warm, humid environments. While they’re often grown outdoors, monstera plants make excellent indoor houseplants as well. Here are just a few of the benefits of having a monstera plant in your home.

Air Purification

One of the most important benefits of monstera plants is their ability to purify the air. These plants are effective at removing harmful toxins such as formaldehyde and benzene from the air, which can be beneficial for both your physical and mental health. Not only will you be able to breathe easier, but you’ll also feel better mentally knowing that the air in your home is clean and healthy.

Improved Mood

In addition to purifying the air, monstera plants can also improve your mood. Studies have shown that being around plants can boost your mood and reduce stress levels. If you’re looking for a way to feel calmer and happier, adding a monstera plant to your home is a great option.

Increase Productivity

When you feel stressed or anxious, it’s difficult to focus on tasks at hand. However, being aroundmonstera plants has been shown to increase productivity levels. If you find yourself struggling to concentrate, try adding a monstera plant to your workspace. You may be surprised at how much of a difference it makes.

Monstera plants offer a multitude of benefits that make them ideal houseplants. Not only do they purify the air and improve your mood, but they can also increase your productivity levels. So if you’re looking for a plant that does it all, look no further than the monstera plant.

How to Grow Monstera

Find a balance between sun and shade. If Monstera is given too much sun, the leaves will yellow. If it’s left in the dark, the plant will exhibit something called negative phototropism, where new leaves grow towards the dark, rather than the light. (It’s a pretty clever trick: In the jungle, darkness signals the presence of a larger tree that Monstera can climb up to reach sunlight.) Since this

Water Monstera moderately and evenly, about once a week. Wait until the soil is fairly dry before watering again. Keep in a fairly humid environment.

The Monstera will grow in most household temperatures, but a temperature between 65-85℉ is ideal. They can survive in temperatures as low as 50℉, but the cold temperature will stop growth.

https://www.youtube.com/watch?v=izsbLWvqe3s

Practical Steps To Buying Monstera Plants

Monstera plants are raised in greenhouses in which the air is warm and humid. When brought into the average home, they need to withstand more adverse conditions than the average outdoor plant. Challenging conditions such as minimum light, inadequate ventilation, warmer temperatures, drafts, and dry air contribute to stressful conditions for plants. Considering the following points will help in the selection of house plants that will complement your interior decor and live for many years to come.

1. Strong and vigorous. Give the plant a quick shake. A plant that’s unsteady in its pot may not be well-rooted. Shaking the plant also tells you whether the plant has whiteflies that will scattered in every direction if the plant is infested.

2. Evergreen – Since it will be seen everyday of the year, plants need to be evergreen. Be sure the leaves aren’t falling off.

3. Attractive – Some of the foliage plants will flower from time to time, but the primary reason for purchasing is the plant’s foliage and how the plants grow. The leaves may be selected for their color or form, or both and the growth habit should be attractive and require minimum maintenance.

4. Slow-growing – Select plants that are slow-growing without a lot of pruning or training. They will perform better over a longer period of time.

5. Crowded roots – Check the bottom of the plant for roots coming out of the drainage hole. Roots emerging from holes in the pot don’t necessarily mean that the plant is under-potted, but it’s frequently a first symptom. Root bound plants will require transplanting when you get the plant home.

6. Unhealthy roots – If you can, have the clerk take the plant out of the pot to check for crowded roots. Roots come in all shapes, sizes, and colors. They should always feel firm and not squishy. Squishy roots are a sign of root rot.

7. Stem or root rot – Sniff the potting mix. Signs of rot smell like the sickly sweet smell of a rotting potato. Don’t buy this plant, as it likely has a bad case of stem rot or root rot.

8. Leaf spots, yellowed leaves, or abundant leaf loss – Leaf spots can be a sign of disease or caused by the jostling of the plants in a garden center. A yellow leaf or two at the base of the plant is nothing to worry about. If you see many yellow or fallen leaves, however, the plant’s probably stressed and therefore not a good choice. Damaged leaves never recover. Ask yourself whether you are willing to wait for the plant to produce new leaves or would you rather purchase a healthier looking specimen.

9. Leggy plants or brown leaf tips – These conditions are signs of a plant that has not received adequate care over a period of time. Spindly plants indicate a lack of adequate light.

10. Signs of insects or disease – Look under the leaves and at the leaf axial (the place where the leaf attaches to the stem) where most often pests hang out. Do not purchase this plant, as not only will you have a problem with it, but you may also infest the other plants in your home.

Variegated Monstera Deliciosa Plant

variegated monstera

The coveted variegated monstera is one of the hottest rare plants! The iconic split leaves of the Monstera deliciosa are unmistakable, except rather than green, this plant’s foliage is either partially or entirely hypnotic white. It’s a plant commonly referred to as the Variegated Monstera, and though pictures of it populate our Instagram feeds, getting your hands on one is no easy task.

Many plants with white variegation tend to be more delicate than their green counterparts, and the Variegated Monstera is no exception. Naturally, this can occur in all sorts of features, but when there’s a mutation in chlorophyll, the green pigmentation in plants, we call that chimera variegation, resulting in a mix of tissue with the chlorophyll and tissue without it, the latter resulting in shades of silver and pale yellow. Growing them is not only slow, but also requires a certain level of skill. Combine this with incredibly high demand, and you’ve got a rare plant that is going to be tough to find, and if you do find it, it will cost you!

How to Care for Variegated Monstera Plant

For the most part, variegated monstera aren’t too different from their fully green counterparts, which is great news! Monstera deliciosa are known for being tough plants that grow rapidly in good light and only need regular watering. The main difference is the white portion of the variegated Monstera leaves cannot absorb light, so the plant needs to work twice as hard to photosynthesize. Therefore, low light conditions are not ideal and you should keep your variegated Monstera in bright ambient light to make it happy.

Monsteras appreciate a warm, humid environment, a good amount of water and gentle sunlight. Place your Monstera away from vents and drafts where it would be subjected to dry air and in a spot where it can receive medium to bright indirect light.

Frequently Asked Questions

Q: My Monstera is turning yellow?

A: Most often yellowing occurs due to over or underwatering. If you see a combination of yellow and brown on the same leaf, it is typically due to overwatering. If fully yellow leaves, along with some brown crispy spots on additional leaves occur then it could be underwatering.

Q: How often should I fertilize my plant?

A: In general, house plants will thrive when they are fertilized spring through fall. Fertilize once a month with an organic houseplant fertilizer, following the package instructions for dilution and administration.

Q: How often does my plant need to be re-potted?

A: For larger floor plants, we suggest re-potting every 18-24 months. Typically you want to choose a potting vessel 2”- 4” larger in diameter to allow for growth. Don’t choose a pot much larger than the previous as this could drown the plants roots. If you prefer to maintain the current size of your plant, re-pot into the same vessel, providing new soil and trimming away some roots and foliage. Spring or summer is the ideal time to re-pot as the plant is at its strongest.