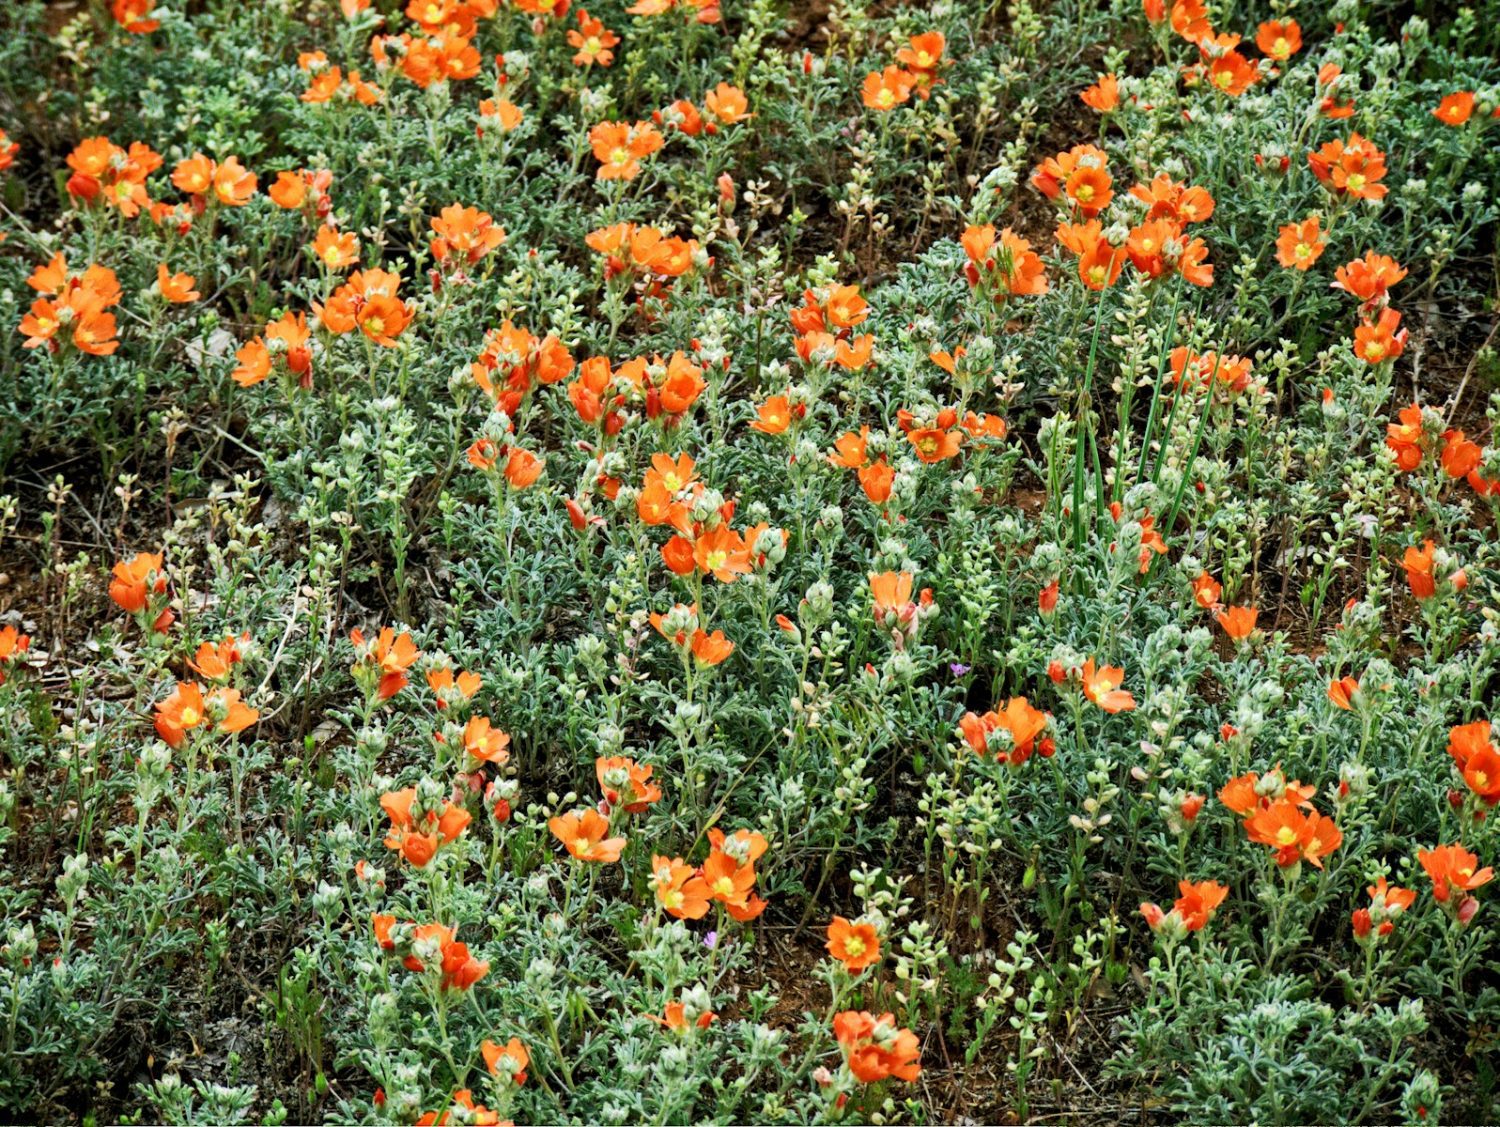
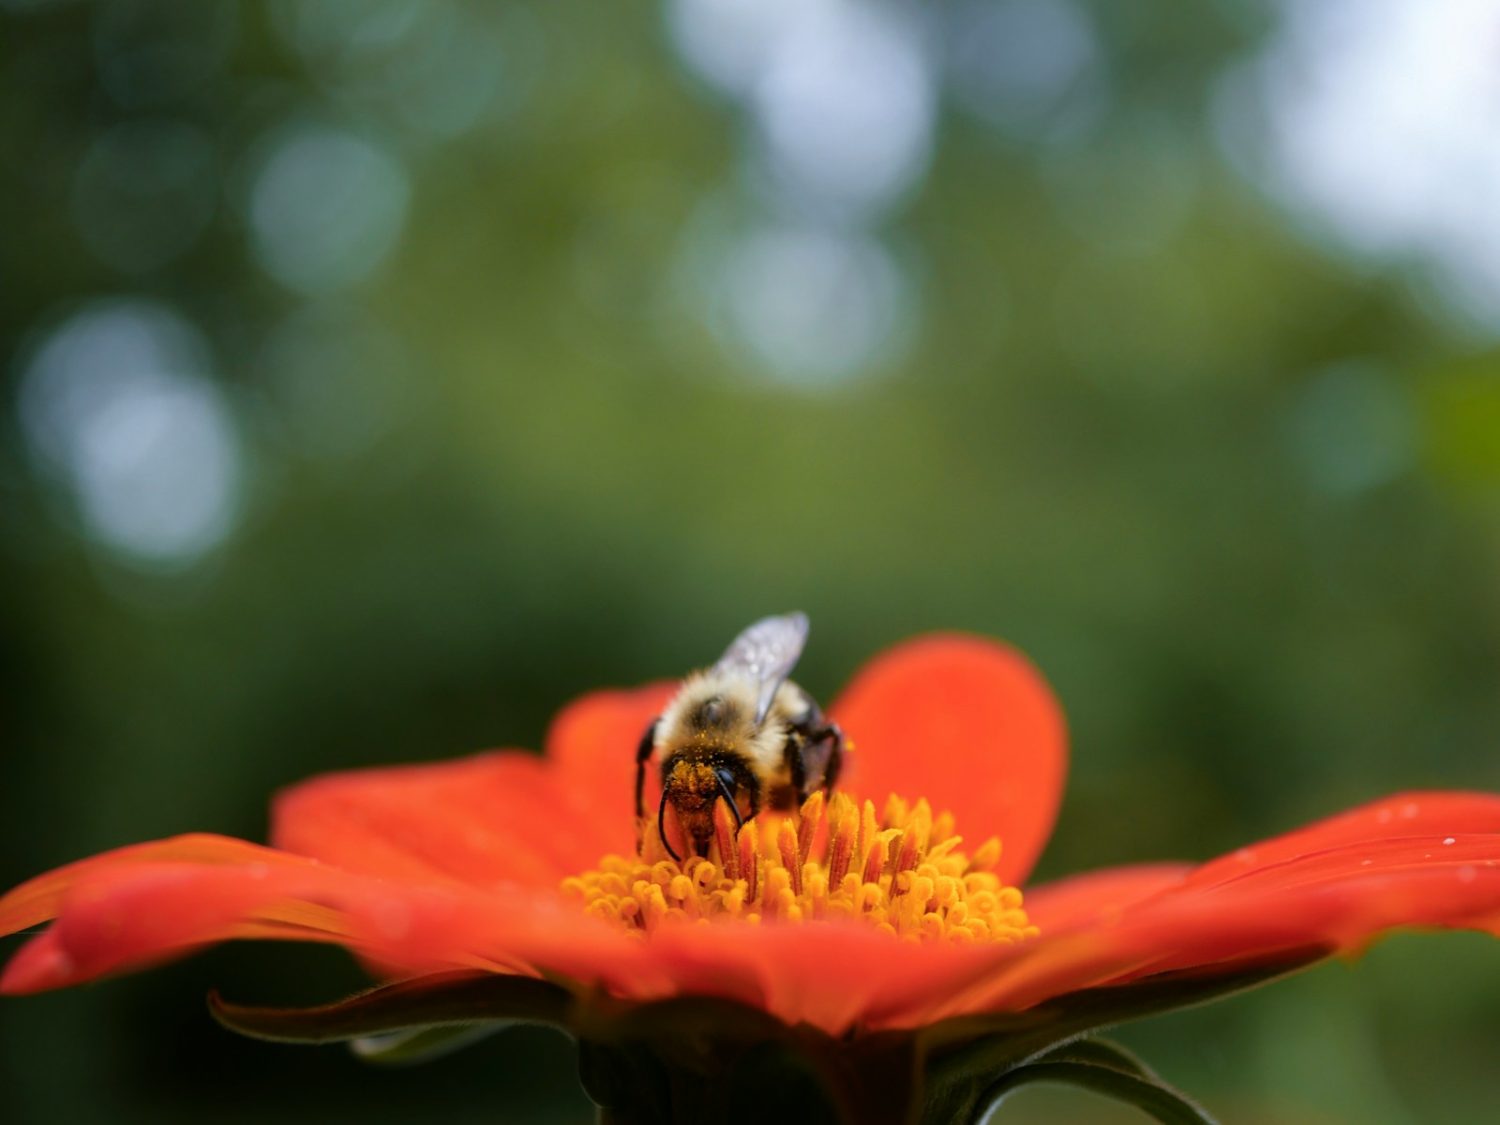
Posted on

Low-Maintenance Perennials for Year-Round Color

Low-Maintenance Perennials for Year-Round Color

Creating a vibrant garden that stays beautiful through every season is easier than it sounds. The secret? Low-maintenance perennials. These plants return year after year with little effort, offering steady color and texture without constant replanting. Once you choose the right varieties and place them thoughtfully, your garden almost takes care of itself. Let’s explore some of the best perennials for long-lasting color and learn how to keep them thriving with minimal work.


Why Perennials Are Perfect for Easy Gardening

Perennials are plants that live for more than two years. Unlike annuals, which need replanting every season, perennials settle in and return on their own. Once established, many varieties handle drought, resist pests, and even thrive in poor soil. This means less watering, fewer replacements, and more time enjoying your garden instead of working in it.

Low-maintenance perennials are especially valuable for busy gardeners. They provide structure and reliability, acting as the backbone of your landscape. Even better, many bloom at different times of the year, creating a continuous wave of color.


Planning for Year-Round Color

A garden that shines in every season takes a little planning up front. The key is choosing perennials that bloom at different times and pairing them with plants that have colorful foliage or seed heads. This mix ensures there’s always something interesting happening, even in winter.

  • Spring: Focus on early bloomers like creeping phlox or columbine. Their flowers bring life after a long winter.
  • Summer: Introduce bold color with coneflowers, black-eyed Susans, and daylilies.
  • Fall: Asters and sedum extend the season with late flowers and warm hues.
  • Winter: Evergreens and ornamental grasses keep the garden lively with texture and structure.

By layering these types, you can create a garden that feels alive all year long.


Perennials for Spring Color

Spring marks the start of the show. After months of cold, early perennials deliver bursts of color that signal warmer days ahead.

Creeping Phlox (Phlox subulata)

This low-growing groundcover blankets the garden in carpets of pink, purple, or white flowers. It spreads easily, making it perfect for slopes or edging paths. Once established, it thrives with very little care.

Hellebores (Helleborus orientalis)

Known as Lenten roses, hellebores bloom in late winter to early spring. Their nodding flowers in soft pinks, purples, and creams are a welcome surprise during chilly days. These plants are evergreen and deer-resistant, making them perfect for shady spots.

Columbine (Aquilegia)

Delicate, nodding flowers appear in mid-spring, often in shades of blue, red, or yellow. Columbines reseed themselves and attract hummingbirds, adding life to your garden with little effort.


Perennials for Summer Brilliance

Summer is the season of abundance, and low-maintenance perennials ensure your garden stays lively during the hottest months.

Coneflower (Echinacea)

A true garden staple, coneflowers produce daisy-like blooms in purple, pink, and even orange or white. They are drought-tolerant, loved by pollinators, and bloom for weeks on end.

Black-Eyed Susan (Rudbeckia hirta)

Golden-yellow petals with dark centers make this plant a cheerful sight in midsummer. Black-eyed Susans are hardy, thrive in poor soil, and continue blooming into fall.

Daylily (Hemerocallis)

Often called the “perfect perennial,” daylilies tolerate neglect, poor soil, and drought. Their trumpet-shaped flowers come in countless colors, and many varieties rebloom later in the season.


Perennials for Fall Beauty

As temperatures cool, certain perennials step into the spotlight, keeping the garden vibrant long after summer’s peak.

Asters (Symphyotrichum spp.)

Asters are fall stars, offering daisy-like flowers in shades of purple, pink, and white. They’re pollinator magnets, especially for migrating butterflies.

Sedum (Sedum spectabile)

Also called stonecrop, sedum thrives in poor soil and full sun. Its succulent leaves turn deep red or bronze in fall, and its clusters of pink flowers transition into rich seed heads that last through winter.

Japanese Anemone (Anemone hupehensis)

Tall stems topped with soft pink or white blooms sway gracefully in autumn breezes. Japanese anemones spread gently over time, filling shady or partially sunny areas with elegance.


Perennials with Winter Interest

Winter doesn’t have to mean a dull garden. Many perennials and ornamental plants provide color and texture even in the coldest months.

Evergreen Heuchera (Coral Bells)

Heucheras are grown for their foliage, which comes in shades of burgundy, silver, and lime green. Their evergreen leaves keep beds colorful through winter and pair beautifully with spring bulbs.

Ornamental Grasses

Grasses like switchgrass or feather reed grass hold their plumes well into winter. Their golden stalks sway in the wind and catch frost beautifully on cold mornings.

Hellebores (Again!)

Because hellebores keep their foliage year-round and bloom early, they bridge the gap between winter and spring, providing color when little else does.


Tips to Keep Perennials Thriving with Minimal Effort

Even the easiest plants benefit from a few simple habits. These steps will keep your garden looking fresh without demanding constant work:

  • Start with the right plant in the right place. Match sun and soil conditions to what each plant prefers. This single step prevents most problems.
  • Water deeply but infrequently. Once perennials are established, they need far less water than annuals.
  • Mulch generously. A layer of mulch suppresses weeds, keeps soil moist, and adds organic matter as it breaks down.
  • Divide when necessary. Every few years, dig up and split crowded clumps to keep them vigorous and spread color to new areas of the garden.
  • Leave seed heads in winter. Many seed heads look beautiful against snow and provide food for birds. Cut them back in early spring for fresh growth.

Pairing Perennials with Evergreen Structure

For a garden that truly looks good year-round, pair perennials with evergreens. Shrubs like boxwood, dwarf holly, or juniper keep their shape and color, anchoring the design when flowers fade. This creates a sense of balance and makes the space feel intentional even in the off-season.


Why Low-Maintenance Gardens Matter

Life is busy. Gardens should be a joy, not a chore. By choosing resilient perennials, we create spaces that welcome us instead of demand from us. They save money, reduce waste, and support pollinators year after year. Most of all, they allow us to step outside and simply enjoy the beauty around us.


Welcoming Endless Color to Your Garden

With the right perennials, color never truly leaves your yard. It flows from spring flowers to summer blooms, from autumn tones to winter textures. Each season brings its own personality, yet the garden feels connected and whole. By planting thoughtfully now, you create a living canvas that changes but never fades—a space that gives joy in every month of the year.

Posted on

How to Start a Pollinator-Friendly Garden (Bees, Butterflies, and Hummingbirds)

How to Start a Pollinator-Friendly Garden (Bees, butterflies, and hummingbirds)

A pollinator-friendly garden is more than just beautiful flowers. It is a living space that supports bees, butterflies, hummingbirds, and other creatures that keep our ecosystems alive. These pollinators are vital for fruits, vegetables, and native plants to thrive. Without them, many of our favorite foods and flowers wouldn’t exist. Starting your own pollinator garden is easier than you might think, and the rewards are endless. You will see more life in your yard, enjoy colorful blooms, and know you’re helping nature in a powerful way.


Why Pollinators Matter

Pollinators move pollen from flower to flower. This simple act makes plants produce seeds and fruits. About one in every three bites of food you eat is thanks to a pollinator. Apples, tomatoes, blueberries, almonds, and even coffee depend on them. Yet, pollinator populations are in trouble. Habitat loss, pesticides, and climate changes have all reduced their numbers. Creating even a small garden space can make a big difference.


Choosing the Right Location

Start by picking a sunny spot. Most pollinator plants need six to eight hours of sunlight each day. A garden near your vegetables or fruit trees can boost harvests. Avoid areas with heavy foot traffic or where pets play often, so pollinators feel safe. If you only have a balcony or patio, don’t worry. A few containers with the right plants can still attract visitors.


Selecting Plants They Love

Pollinators need two things: nectar and pollen. The best gardens provide both all season long. Choose native plants whenever possible. Native flowers evolved alongside local pollinators and are their favorite food source.

Flowers for Bees

Bees love simple, open blooms they can land on. Good choices include:

  • Coneflowers (Echinacea)
  • Black-eyed Susans (Rudbeckia)
  • Bee balm (Monarda)
  • Goldenrod (Solidago)

Flowers for Butterflies

Butterflies are drawn to clusters of small flowers they can perch on. Try:

  • Milkweed (Asclepias) for monarchs
  • Zinnias for summer color
  • Lantana for constant nectar
  • Verbena for long bloom periods

Flowers for Hummingbirds

Hummingbirds love bright red, tubular flowers. Their long beaks are made for these blooms:

  • Trumpet vine
  • Salvia
  • Columbine
  • Cardinal flower

Mix these plants together so there’s food for every pollinator type.


Plant for Every Season

Pollinators are active from spring through fall. Plan your garden so something is always blooming.

  • Spring: Tulips, hyacinths, wild columbine
  • Summer: Sunflowers, bee balm, lavender
  • Fall: Asters, goldenrod, sedum

Layering blooms like this ensures pollinators never go hungry.


Provide More Than Flowers

A true pollinator garden offers food, water, and shelter.

  • Water: A shallow birdbath or dish with pebbles works perfectly. Pollinators need a place to land while they drink.
  • Shelter: Leave a few bare spots of soil for ground-nesting bees. Add small logs or branches for overwintering insects.
  • Host Plants: Caterpillars need food too. Milkweed feeds monarch caterpillars, parsley feeds swallowtails, and passion vine feeds Gulf fritillaries.

Skip the Chemicals

Pesticides and herbicides harm pollinators, even in tiny amounts. If you must treat pests, use natural methods like hand-picking bugs or introducing beneficial insects (ladybugs, lacewings). Avoid spraying while plants are in bloom.


Create a Welcoming Design

Pollinator gardens don’t need to be wild or messy. Plant in groups of three or more so pollinators notice them from afar. Combine tall and short plants for layers of color. Add paths or stepping stones for easy maintenance. If space is tight, vertical planters or hanging baskets can still help.


Attracting Pollinators Year After Year

Once your garden is established, it will get better each season. Perennials will grow larger, and pollinators will learn to return. Leave some seed heads standing through winter to provide food and shelter. Over time, you’ll notice more butterflies, more hummingbirds, and busier bees.


Benefits Beyond the Garden

A pollinator garden is not just for wildlife. It creates a peaceful space for you too. Watching butterflies drift from flower to flower or hearing hummingbirds buzz by is deeply calming. Children learn about nature firsthand. Neighbors may even be inspired to start their own gardens. Together, these small spaces form a network of safe havens for pollinators everywhere.


Small Steps Make Big Changes

You don’t need acres of land or a perfect plan. Start with a few native flowers in one sunny corner. Add a shallow dish of water. Skip the chemicals. Over time, expand with more plants and blooms for every season. Every patch of habitat helps. Pollinators will find it, and they will thank you with life, color, and movement all season long.


A Garden That Gives Back

When you plant for pollinators, you do more than decorate your yard. You give bees, butterflies, and hummingbirds a safe place to thrive. In return, they bring beauty, joy, and abundance to your world. This partnership is as old as nature itself. And it begins with a single flower in your hand.

Posted on

Plant Seeds: Pollination to Germination

mixture of seeds

Seeds are one of the most important parts of a plant. Not only do they allow plants to reproduce, but they also contain the embryo that will grow into a new plant. Seeds are formed as part of the process of reproduction in seed plants, which includes both gymnosperms and angiosperms. In this blog post, we’ll take a closer look at how seeds are formed, and what goes into making them such an integral part of the plant reproductive process.

When a seed plant is pollinated, the pollen grain germinates and produces a tube that grows down into the ovule. At the tip of this tube, the nucleus of the pollen grain – which contains the male gametes – enters the embryo sac. One of these gametes fertilizes the egg cell in the embryo sac, forming a zygote. The zygote then begins to divide, and the resulting cells begin to grow and differentiate.

mixture of seeds
mixture of seeds

As the embryo grows, it starts to accumulate food reserves. These reserves are stored in the cotyledons, which are thickened leaves that form part of the seed coat. The seed coat itself develops from the integuments of the ovule, and serves to protect the embryo from damage. Once the seed coat is fully formed, the seed is complete.

Seeds play a vital role in plant reproduction, and are essential for ensuring that new plants can grow and thrive. By understanding how they are formed, we can better appreciate the important role that they play in the life cycle of plants.

Seed Dormancy

Seeds can remain dormant – or inactive – for long periods of time. Dormancy is a survival mechanism that helps seeds to survive unfavorable conditions, such as drought or cold temperatures. Once the conditions become favorable again, the seed will germinate and start to grow.

Dormancy can be broken by a number of different methods, including exposure to light, temperature changes, or chemicals. By understanding dormancy, we can better control the germination of seeds, and ensure that they grow when and where we want them to.

Seed Dispersal

Seeds need to be dispersed in order to find suitable conditions for germination. Dispersal can be achieved by a number of different means, including wind, water, animals, and humans.

Wind dispersal is the most common form of seed dispersal. Seeds are carried away by the wind to other locations, where they may find suitable conditions for germination. Water dispersal is another common method, and involves seeds being carried away by water to other areas.

Animals and humans can also play a role in seed dispersal. Animals may eat fruits or seeds and then defecate them in other locations, while humans may deliberately or accidentally transport seeds to new areas.

Seed dispersal is essential for the survival of plants, and helps to ensure that new plants can germinate and grow in suitable areas. By understanding how it works, we can better appreciate the role that dispersal plays in the life cycle of plants.

Seed germination

Seed germination is the process by which a seed starts to grow into a new plant. It involves the growth of the embryo, and the development of the root system and the shoot system. The first step in germination is the activation of the seed, which is usually caused by water. Once the seed is activated, it begins to take in water and nutrients from the surrounding soil.

The embryo then starts to grow, and the root system develops first. The root system anchors the plant in the soil and absorbs water and nutrients from the ground. The shoot system then develops, and the plant begins to grow taller. Once the seedlings have reached a certain size, they become self-sufficient and can start to produce their own food.

Germination is an important step in the life cycle of plants, and is necessary for ensuring that new plants can be grown. By understanding how it works, we can better appreciate the process by which plants come into existence.

Seed dormancy, germination, and dispersal are all essential steps in the life cycle of plants. By understanding how they work, we can better appreciate the role that seeds play in the reproduction of plants.

Basic Seed Starting Steps

There are a few basic steps you need to take in order to start seeds:

1. Choose the right container: You’ll need something that has drainage holes in the bottom, and is big enough to fit all of the soil and seeds you’ll be planting.

2. Choose the right soil: Use a quality potting mix that will allow your seeds to germinate and grow properly.

3. Plant your seeds: Follow the specific instructions on the seed packet for how deep to plant your seeds and how far apart to space them.

4. Water your plants: Seeds need water in order to germinate, so make sure to keep the soil moist but not soggy.

5. Monitor your plants: Keep an eye on your plants and make sure they’re getting enough light, water, and nutrients.

With a little care and attention, you can successfully start your own seeds at home! Follow these tips and you’ll be well on your way to growing your own plants from seed.

Posted on

Planting, Growing and Caring for Alliums: The Ultimate Guide

Allium, Serendipity

Looking to add some vibrant color and texture to your garden? Alliums are the perfect plants for you! With their globe-shaped flowers and interesting foliage, they can really make a statement. In this guide, we will teach you everything you need to know about planting, growing and caring for alliums. So whether you’re a beginner or a seasoned pro, read on for tips and advice that will help you get the most out of these beautiful plants!

Types of Alliums

There are many different types of alliums. Some have flowers that are shaped like a ball and some have leaves that are interesting.

Some of the most common alliums are:

Allium schoenoprasum – This is the most common type of allium. It has a round, globe-shaped flower and interesting foliage.

Allium cepa – This allium is also known as the onion plant. It has a round, globe-shaped flower and interesting foliage.

Allium sativum – This allium is also known as garlic. It has a round, globe-shaped flower and interesting foliage.

Planting Alliums

When planting alliums, it is important to choose a location that has well-drained soil. Alliums do not like to sit in wet or soggy soil. They also prefer full sun, but can tolerate partial shade.

To plant alliums, dig a hole that is twice the width and depth of the bulb. Plant the bulb with the pointy end facing up. Cover with soil and water well.

Caring for Alliums

Once your alliums are planted, they will need regular watering. Water them when the soil is dry to the touch. Alliums are not drought tolerant, so make sure to keep an eye on the soil and water as needed.

Fertilize your alliums once a month with a balanced fertilizer. This will help them to grow and bloom.

Alliums are not susceptible to many pests or diseases, but they can be affected by rust. Rust is a fungus that can cause the leaves of the allium to turn yellow and eventually fall off. If you notice rust on your alliums, remove any affected leaves and dispose of them. You can also treat the plant with a fungicide.

Once your alliums have finished blooming, cut off the flower heads. This will encourage the plant to put its energy into next year’s bloom.

Alliums are beautiful plants that add color and texture to any garden. With their globe-shaped flowers and interesting foliage, they are sure to make a statement. By following the tips in this guide, you will be able to successfully plant, grow and care for alliums. So get out there and enjoy these beautiful plants!

We hope you enjoyed this guide on planting, growing and caring for alliums. For more gardening tips and advice, be sure to check out our blog. Thanks for reading!

Posted on

The Fascinating World of Succulent Plants: Ultimate Guide

Growing Succulent Plants

If you’re like most people, you probably think of cacti when you hear the word “succulent.” However, succulent plants come in all shapes and sizes, and there is much more to them than just prickly plants that thrive in the desert. In this blog post, we will discuss everything you need to know about succulent plants. We’ll cover what they are, how to care for them, and some interesting facts about these fascinating plants!

Succulent plants are a type of plant that has thick, fleshy leaves or stems. This type of plant is adapted to living in dry environments, as the thick leaves and stems help to store water. Succulent plants come in all sorts of shapes and sizes, from small, delicate-looking plants to large, tree-like succulents.

Now that you know a bit more about succulent plants, let’s take a look at some interesting facts about these fascinating plants!

Light

Growing Succulent Plants

Growing succulent plants benefit from getting a few hours of sun. Put succulents outdoors during morning hours, gradually increasing their exposure to direct sunlight over several days or weeks until they’re used to full sun exposure. You can also place succulents into an area that receives indirect light all day long. This will allow them to adjust more slowly by giving succulent leaves time to react and close up during periods of intense heat or bright light while still receiving adequate water and nutrients.

Treat succulents as houseplants and keep them near a sunny window, at least 6 to 8 hours of sun exposure per day. If your succulents aren’t getting enough sunlight, the leaves will be thin and succulent rosettes will be small.

Water

Keep growing succulent plants evenly moist and fertilize them with a dilute (half-strength) plant food solution, but don’t fertilize succulents that go outdoors until the weather warms up enough for succulent leaves to begin opening again – then stop fertilizing altogether once succulents start storing energy for next year’s succulent growth.

If your succulents are inside, water succulents when they look shriveled or let them dry out. Water succulents until the water trickles through the drainage hole – succulents also absorb moisture through their succulent leaves. Finally, water your succulents sparingly; too much water can lead to root rot.

Soil

Soil is the primary growing medium, choose a well-draining soil and be sure to adjust your soil mixture based on where you plan on growing succulent plants. Succulent soil should drain well and not hold too much moisture. Most soil mixtures for cacti include coarse sand or perlite (or both) as primary ingredients, with composted bark or other organic matter incorporated. If you want to use soil that doesn’t include sand, perlite or bark as an ingredient, make sure you purchase a bagged potting soil designed for cactus and succulents ¢â‚¬â€œ do not use topsoil from your garden! You can also make your own custom soil mix using materials like: 1/3 soil, 1/3 compost, 1/3 perlite. Succulents require soil that is free of plant food or fertilizers since these will burn your succulent’s roots and ultimately kill the plant.

Succulent Plants

Huernia zebrina, Lifesaver Plant

Most succulents require a lot in order to thrive and that¢â‚¬â„¢s where Huernias like this one (Huernia zebrina Lifesaver Plant) come into play. This plant is easy-to-grow and has an unusual beauty when in bloom. The lifesaver plant (Huernia zebrina) is perfect for beginners or experts alike!

Aloe, White Fox

Aloe ¢â‚¬ËœWhite Fox¢â‚¬â„¢ is a dwarf succulent that displays rosettes of thick green leaves with distinctive white markings that become more prominent in bright light.