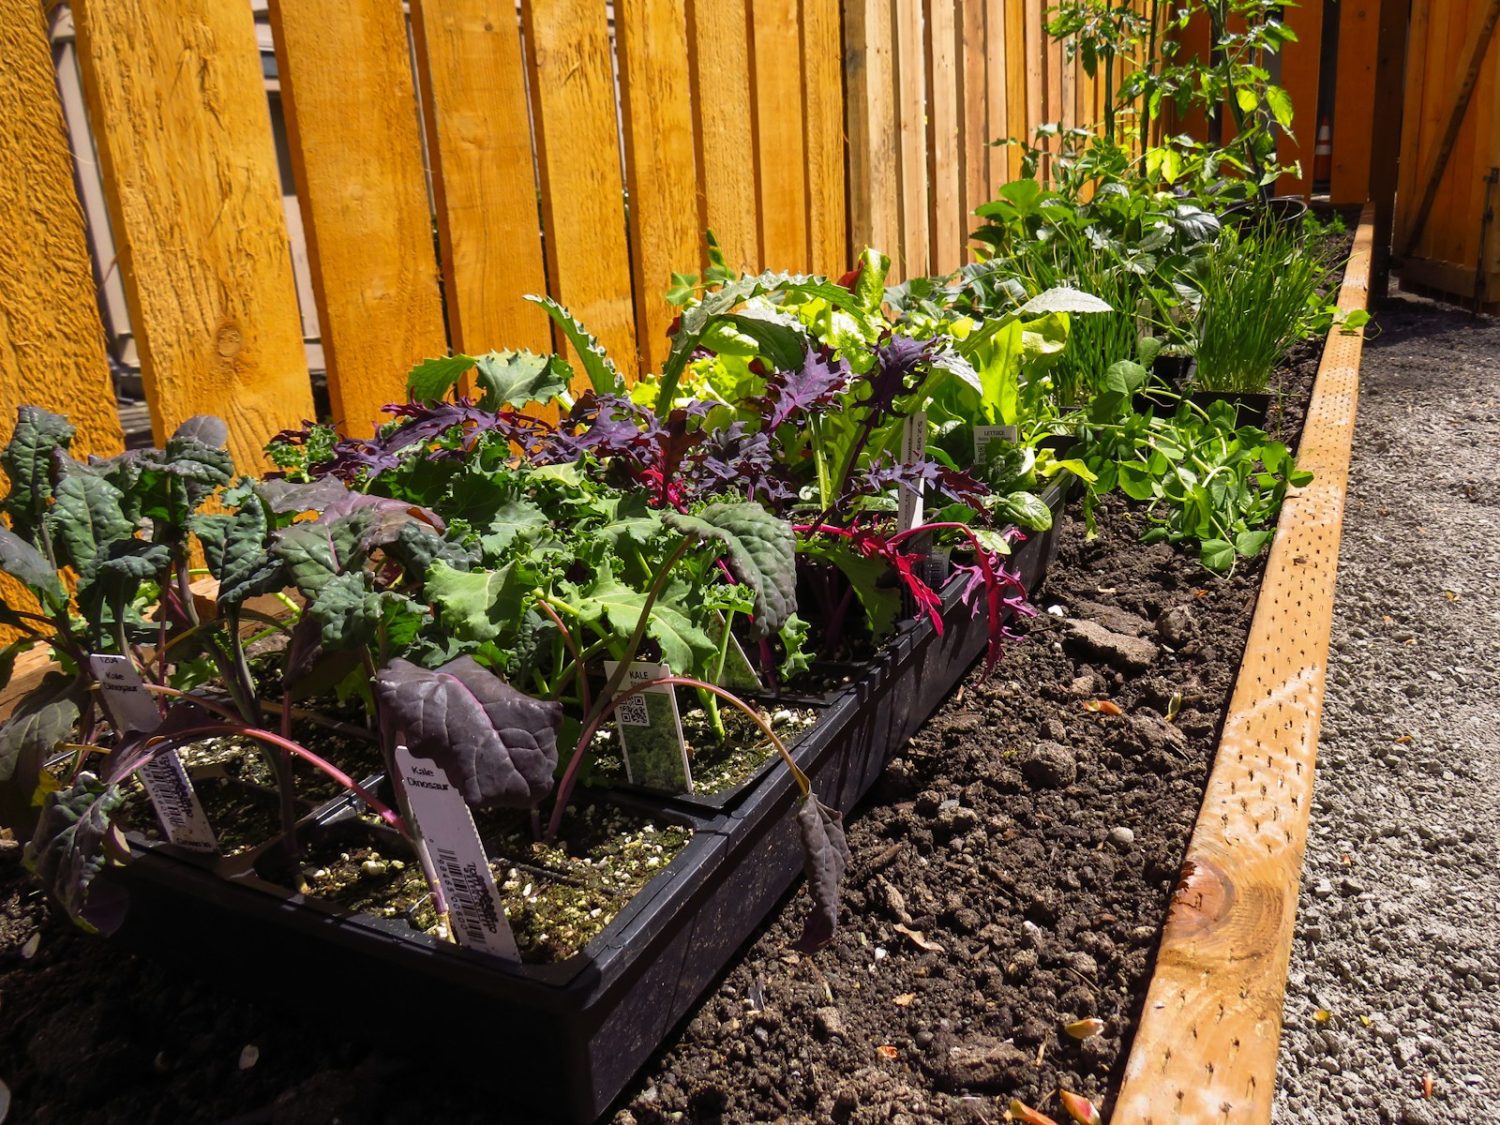
Posted on

What Is Garden Party Attire?

What Is Garden Party Attire?

When you hear the words “garden party,” a very specific picture may come to mind. Sunlight filtering through trees. Tables dressed with flowers. Friends chatting on a lawn while sipping something cold. It feels elegant but never stiff. That’s where the idea of garden party attire comes in. It’s about dressing with a touch of grace while still keeping comfort close at hand.

Garden party attire isn’t just one outfit or one rule. It’s a balance. You want to feel polished enough for photos and mingling, but also relaxed enough to move easily across grass and gravel. Think of it as daytime chic with a natural twist. Instead of heavy fabrics, you lean toward light ones. Instead of dark tones, you invite color. Instead of sharp edges, you bring softness.

Let’s take a deeper look at what makes this style unique, how you can put it together, and why it continues to charm hosts and guests alike.


The Spirit of Garden Party Style

At its core, garden party attire is guided by the setting itself. You are outside, surrounded by flowers, greenery, and often sunshine. The environment asks for lightness, both in mood and in fabric. That is why the first rule is simple: keep it airy.

Women’s Choices

Dresses are the classic option. Floral prints, pastels, and flowing cuts are always welcome. Sundresses, tea-length dresses, or even jumpsuits in soft fabrics fit beautifully. Fabrics like cotton, linen, chiffon, and silk blends breathe easily. You want movement and comfort, not stiffness.

Shoes make a difference. Stilettos sink into grass, so block heels, wedges, or dressy flats are the smarter choice. A delicate sandal works perfectly. Hats, too, can be part of the look—wide brims not only add charm but also protect you from the sun.

Accessories lean toward the natural. Think straw bags, pearl earrings, or a light scarf. The key is not to overload. One or two accents are enough.

Men’s Choices

Men often aim for smart-casual with a garden twist. Light-colored trousers or chinos paired with a button-down shirt set the right tone. A linen blazer can lift the look, but it should never feel too formal.

Ties are optional, often skipped. Loafers, suede shoes, or even polished dress sneakers can work. Leather sandals, in the right cut, may also fit. The secret is ease.

Patterns are welcome. Subtle florals, checks, or stripes echo the surroundings. Pocket squares or lightweight hats add personality without going overboard.

Children’s Choices

For younger guests, garden parties are perfect occasions for playful but tidy outfits. Dresses with floral prints, light cardigans, or tailored shorts with collared shirts work well. Closed-toe shoes help little ones move across uneven ground. Comfort is the main guide, with just a hint of polish.


How to Choose the Right Outfit

Now that we see the spirit, how do you make your choice? Think of three factors: season, setting, and mood.

Season Matters

Spring garden parties often call for bright florals and pastel tones. Summer leans into light fabrics and sleeveless designs. Autumn may bring warmer colors like rust, gold, or plum, often layered with light sweaters or jackets.

Winter garden parties, though rare, can still work with deeper tones and heavier fabrics, always balanced by layering.

Setting Plays Its Part

Is the garden party at a private home, a public botanical garden, or even a vineyard? The backdrop influences the level of formality. A casual backyard barbecue-style gathering might allow sundresses, polo shirts, and sandals. A wedding reception in a rose garden may call for something more refined—cocktail dresses, tailored suits, and coordinated accessories.

Mood of the Event

The host’s invitation often signals the tone. Words like “casual garden party” suggest ease. Phrases like “garden cocktail reception” lean more formal. Always read between the lines. If in doubt, it is better to dress slightly more polished than too relaxed.


Why Garden Party Attire Endures

Garden party attire holds a timeless charm because it does more than dress the body. It shapes the atmosphere of the event.

When everyone arrives in coordinated lightness—florals, linens, airy colors—the setting feels like a painting. It lifts the mood. It makes photos glow. It creates a shared sense of occasion.

It also bridges two worlds. On one side, you have the elegance of a formal gathering. On the other, the ease of being outdoors. Garden party attire blends the two in harmony. That balance is rare, and it explains why the style has lasted for generations.

We also can’t ignore the practical side. Outdoor events come with sunlight, uneven ground, and sometimes a breeze. This attire respects that. Shoes that don’t sink, fabrics that breathe, hats that shade—it all makes sense.

And perhaps most of all, it connects us to nature. Dressing for a garden party means dressing with the garden itself in mind. Colors echo flowers. Fabrics flow with the breeze. Accessories nod to natural textures. It is clothing that honors its setting.


Graceful Style for Memorable Gatherings

When we ask “what is garden party attire,” we are really asking something deeper. We are asking how to match our look to the beauty of the moment. The answer is always balance: comfort paired with polish, nature paired with refinement.

Choose airy fabrics. Embrace color. Skip the shoes that sink. Add one detail that makes you smile, whether a floral print, a linen jacket, or a simple hat.

In the end, garden party attire isn’t about rules. It’s about joining the story of the day. You step into the garden not just as a guest, but as part of the scene. And when we dress in that spirit, the gathering becomes more than a party. It becomes a memory that lingers long after the last glass is lifted.

Posted on

How to Keep Deer Out of Your Garden

How to Keep Deer Out of Your Garden

Deer look charming when you see them at the edge of a meadow or crossing a woodland path. But when they step into your garden, charm turns into frustration. A few quiet visits can undo months of care, leaving stems stripped, buds missing, and vegetables nibbled down to stubs. The good news is that we have many tools to protect our gardens without losing the beauty of sharing space with wildlife.

In this guide, we will explore smart ways to keep deer out of your garden. We’ll look at barriers that work, plants that discourage nibbling, and simple tricks that change deer behavior. Each option has strengths, and when you combine them, you create a garden that is both welcoming to people and resistant to hungry visitors.


Building Strong Barriers

The first and most effective line of defense against deer is a physical barrier. Deer are excellent jumpers, so a small fence or short hedge will not do much to stop them. Instead, you want to think taller, sturdier, and sometimes even trickier.

Tall fencing is the gold standard. Deer can jump up to eight feet, so your fence should reach at least that height. Some gardeners go even taller, closer to ten feet, if deer pressure is heavy. Wire mesh or woven wire is strong and reliable. It also lets light through, so your garden still feels open.

If height is not possible, double fencing can be just as powerful. Two fences set about four feet apart confuse deer. They don’t like to jump into a narrow space because landing feels risky. This method often uses two shorter fences, about four to five feet high each, but spaced carefully to create that visual and physical block.

Electric fences add another layer of defense. These are not dangerous, but they do give deer a quick zap that teaches them to keep away. Many gardeners use strands of electrified wire or tape. The key is maintenance. Weeds touching the wire can reduce the charge, so you’ll need to check it often.

Another option is temporary barriers like mesh netting. These are lightweight, easy to install, and good for smaller garden beds. They may not last for years, but they are affordable and quick to put in place during peak growing months.

In other words, a strong barrier takes the guesswork out. It does cost time and money, but once in place, it gives you peace of mind.


Choosing Deer-Resistant Plants

Not every plant appeals to deer. They tend to favor tender, sweet, and fragrant greens. They also avoid plants with strong scents, fuzzy leaves, bitter sap, or prickly stems. By adding more of the plants they dislike, you can reduce the draw of your garden.

Herbs like lavender, rosemary, sage, and thyme are all poor choices for deer. Their strong oils make them unappetizing. Many gardeners use them to border vegetable plots or line walkways as a natural deterrent.

Ornamental flowers such as daffodils, foxglove, allium, and poppies are also low on the deer menu. These add bright color to beds while keeping risk down. Meanwhile, plants like lamb’s ear or dusty miller have textures that deer avoid.

When it comes to shrubs, boxwood, barberry, and holly stand strong. Their scents or spiny leaves make them less likely to be chewed. For trees, options like spruce, fir, and magnolia are often safer than tender fruit trees.

This does not mean deer will never nibble them. A hungry deer will sometimes try anything. But when you fill your garden with plants that deer find unpleasant, you lower the chances of heavy browsing.

The best approach is a mix. Place deer-resistant plants along garden edges, use herbs to create protective borders, and keep the most tempting crops closer to the house or inside fenced sections.


Using Deterrents and Smart Tricks

Fences and plant choice are long-term strategies. But sometimes you need extra tricks to reinforce the message: “This garden is not for you.” That’s where repellents and scare tactics come in.

Scent-based repellents are very common. These often use ingredients like garlic, rotten eggs, or predator urine. They smell unpleasant to deer and make them think danger is near. You can spray them on plants or place them around the garden perimeter. The catch is that they wash away with rain, so regular reapplication is key.

Motion-activated devices can startle deer before they get too comfortable. These might be sprinklers that spray water when triggered, or lights that flash suddenly. Deer are cautious creatures, so a surprise can be enough to make them retreat.

Homemade tricks also play a role. Some gardeners hang bars of soap, human hair, or shiny aluminum strips in their gardens. Others use wind chimes or reflective tape. The goal is to add strange smells, sounds, or sights that make deer think twice.

Rotation matters too. Deer are smart. If you use the same method week after week, they may adapt. Switching between repellents and changing their placement keeps deer on edge.

And don’t forget garden layout. Place your most vulnerable crops closer to paths, patios, or doorways where human activity is high. Deer prefer quiet corners, so the more visible and active the spot, the safer your plants will be.


Keeping Balance with Wildlife

At the heart of all these strategies is balance. We share space with deer, and part of living in harmony means protecting what we grow while respecting their place in the ecosystem.

Strong barriers keep your work safe. Deer-resistant plants make your beds less appealing. Repellents and tricks add another layer of safety. When you combine these tools, you build a garden that deer will likely skip in favor of easier meals elsewhere.

But most of all, these steps give you freedom. Freedom to plant the flowers you love, to grow vegetables with confidence, and to enjoy evenings in your garden without worry.


A Peaceful Garden Future

Deer may never stop wandering near our homes, but they don’t have to destroy our hard work. With tall fences, clever planting, and a few creative tricks, we can protect our spaces while still living side by side with wildlife.

The joy of gardening comes from watching seeds turn into blooms, from harvesting food we nurtured, and from relaxing in a space we built with care. When deer no longer threaten that joy, our gardens feel whole again.

So let’s build barriers, plant wisely, and use every tool available. Together, we can create gardens that flourish—safe, abundant, and full of life. That is the path to a truly peaceful garden future.

Posted on

How to Keep Chickens Out of Your Garden

How to Keep Chickens Out of Your Garden

A garden is a place of peace, beauty, and food. Chickens, as lovely as they are, can quickly turn that space into chaos. They scratch up soil, eat young plants, and scatter mulch like tiny feathery bulldozers. While we enjoy their eggs and their company, we don’t always want them roaming freely in our growing beds.

The good news is that you don’t have to choose between chickens and a thriving garden. With a mix of barriers, training, and clever design, you can protect your plants while still giving your flock room to explore. Let’s look at the best ways to do it.


Why Chickens Head for the Garden

Chickens are curious by nature. They don’t mean to destroy your garden, but their habits cause trouble. Scratching is how they search for bugs and seeds. Dust bathing is how they keep their feathers clean. Pecking at greens is part of their diet. To them, your garden is paradise. To you, it can feel like sabotage.

Understanding their instinct helps us find better solutions. Instead of trying to change their nature, we guide it.


Practical Ways to Protect Plants

Fencing and Barriers

The simplest defense is a barrier. A chicken can’t ruin what it can’t reach.

  • Wire fencing: A 3–4 foot tall fence works for most flocks. Some adventurous birds may fly over, so consider adding mesh or netting above if needed.
  • Garden hoops and row covers: These protect smaller plants and seedlings while still letting in sun and water.
  • Chicken wire collars: Wrapping a circle of wire mesh around the base of larger plants keeps scratching feet away.

Designated Chicken Zones

Give your flock a place where digging is allowed. A dust bath pit filled with sand, ash, or dry soil keeps them busy. A compost corner stocked with garden scraps can also redirect their energy. If they have their own playground, they’re less tempted by yours.

Raised Beds and Containers

Height is your friend. Chickens are less likely to climb into tall beds or knock over sturdy pots. Raised beds not only protect plants but also make gardening easier for you.

Deterrents

Some gardeners use harmless deterrents to keep birds at bay. Wind spinners, reflective tape, or even motion-activated sprinklers startle chickens just enough to teach boundaries. The key is consistency—place them where the flock tends to wander.


Training and Routine

Chickens are creatures of habit. With time, they can learn where they’re welcome and where they’re not.

  • Supervised free-ranging: Let them roam only when you are present. A quick clap or gentle shoo teaches them to avoid the garden.
  • Treat training: Toss grain or scraps in their designated zone so they associate that area with rewards.
  • Timing: Allow them out late in the day after they’ve eaten. A full crop means less mischief.

Finding Balance Between Flock and Garden

The goal isn’t to keep your chickens locked away forever. It’s about balance. You want eggs, pest control, and happy hens. You also want healthy vegetables and flowers. Both are possible.

Chickens can even help if managed well. They till soil in fall, clean up weeds, and eat pests. By guiding when and where they work, you protect your plants and harness their natural skills.


Shared Spaces, Peaceful Places

Keeping chickens out of your garden doesn’t mean shutting them out of your life. It means setting clear boundaries. With fences, raised beds, and clever training, your garden stays safe and your flock stays happy.

In other words, we don’t fight against their nature. We work with it. That’s the secret to harmony—healthy plants, thriving chickens, and a space where both can belong.

Posted on

Low-Maintenance Perennials for Year-Round Color

Low-Maintenance Perennials for Year-Round Color

Creating a vibrant garden that stays beautiful through every season is easier than it sounds. The secret? Low-maintenance perennials. These plants return year after year with little effort, offering steady color and texture without constant replanting. Once you choose the right varieties and place them thoughtfully, your garden almost takes care of itself. Let’s explore some of the best perennials for long-lasting color and learn how to keep them thriving with minimal work.


Why Perennials Are Perfect for Easy Gardening

Perennials are plants that live for more than two years. Unlike annuals, which need replanting every season, perennials settle in and return on their own. Once established, many varieties handle drought, resist pests, and even thrive in poor soil. This means less watering, fewer replacements, and more time enjoying your garden instead of working in it.

Low-maintenance perennials are especially valuable for busy gardeners. They provide structure and reliability, acting as the backbone of your landscape. Even better, many bloom at different times of the year, creating a continuous wave of color.


Planning for Year-Round Color

A garden that shines in every season takes a little planning up front. The key is choosing perennials that bloom at different times and pairing them with plants that have colorful foliage or seed heads. This mix ensures there’s always something interesting happening, even in winter.

  • Spring: Focus on early bloomers like creeping phlox or columbine. Their flowers bring life after a long winter.
  • Summer: Introduce bold color with coneflowers, black-eyed Susans, and daylilies.
  • Fall: Asters and sedum extend the season with late flowers and warm hues.
  • Winter: Evergreens and ornamental grasses keep the garden lively with texture and structure.

By layering these types, you can create a garden that feels alive all year long.


Perennials for Spring Color

Spring marks the start of the show. After months of cold, early perennials deliver bursts of color that signal warmer days ahead.

Creeping Phlox (Phlox subulata)

This low-growing groundcover blankets the garden in carpets of pink, purple, or white flowers. It spreads easily, making it perfect for slopes or edging paths. Once established, it thrives with very little care.

Hellebores (Helleborus orientalis)

Known as Lenten roses, hellebores bloom in late winter to early spring. Their nodding flowers in soft pinks, purples, and creams are a welcome surprise during chilly days. These plants are evergreen and deer-resistant, making them perfect for shady spots.

Columbine (Aquilegia)

Delicate, nodding flowers appear in mid-spring, often in shades of blue, red, or yellow. Columbines reseed themselves and attract hummingbirds, adding life to your garden with little effort.


Perennials for Summer Brilliance

Summer is the season of abundance, and low-maintenance perennials ensure your garden stays lively during the hottest months.

Coneflower (Echinacea)

A true garden staple, coneflowers produce daisy-like blooms in purple, pink, and even orange or white. They are drought-tolerant, loved by pollinators, and bloom for weeks on end.

Black-Eyed Susan (Rudbeckia hirta)

Golden-yellow petals with dark centers make this plant a cheerful sight in midsummer. Black-eyed Susans are hardy, thrive in poor soil, and continue blooming into fall.

Daylily (Hemerocallis)

Often called the “perfect perennial,” daylilies tolerate neglect, poor soil, and drought. Their trumpet-shaped flowers come in countless colors, and many varieties rebloom later in the season.


Perennials for Fall Beauty

As temperatures cool, certain perennials step into the spotlight, keeping the garden vibrant long after summer’s peak.

Asters (Symphyotrichum spp.)

Asters are fall stars, offering daisy-like flowers in shades of purple, pink, and white. They’re pollinator magnets, especially for migrating butterflies.

Sedum (Sedum spectabile)

Also called stonecrop, sedum thrives in poor soil and full sun. Its succulent leaves turn deep red or bronze in fall, and its clusters of pink flowers transition into rich seed heads that last through winter.

Japanese Anemone (Anemone hupehensis)

Tall stems topped with soft pink or white blooms sway gracefully in autumn breezes. Japanese anemones spread gently over time, filling shady or partially sunny areas with elegance.


Perennials with Winter Interest

Winter doesn’t have to mean a dull garden. Many perennials and ornamental plants provide color and texture even in the coldest months.

Evergreen Heuchera (Coral Bells)

Heucheras are grown for their foliage, which comes in shades of burgundy, silver, and lime green. Their evergreen leaves keep beds colorful through winter and pair beautifully with spring bulbs.

Ornamental Grasses

Grasses like switchgrass or feather reed grass hold their plumes well into winter. Their golden stalks sway in the wind and catch frost beautifully on cold mornings.

Hellebores (Again!)

Because hellebores keep their foliage year-round and bloom early, they bridge the gap between winter and spring, providing color when little else does.


Tips to Keep Perennials Thriving with Minimal Effort

Even the easiest plants benefit from a few simple habits. These steps will keep your garden looking fresh without demanding constant work:

  • Start with the right plant in the right place. Match sun and soil conditions to what each plant prefers. This single step prevents most problems.
  • Water deeply but infrequently. Once perennials are established, they need far less water than annuals.
  • Mulch generously. A layer of mulch suppresses weeds, keeps soil moist, and adds organic matter as it breaks down.
  • Divide when necessary. Every few years, dig up and split crowded clumps to keep them vigorous and spread color to new areas of the garden.
  • Leave seed heads in winter. Many seed heads look beautiful against snow and provide food for birds. Cut them back in early spring for fresh growth.

Pairing Perennials with Evergreen Structure

For a garden that truly looks good year-round, pair perennials with evergreens. Shrubs like boxwood, dwarf holly, or juniper keep their shape and color, anchoring the design when flowers fade. This creates a sense of balance and makes the space feel intentional even in the off-season.


Why Low-Maintenance Gardens Matter

Life is busy. Gardens should be a joy, not a chore. By choosing resilient perennials, we create spaces that welcome us instead of demand from us. They save money, reduce waste, and support pollinators year after year. Most of all, they allow us to step outside and simply enjoy the beauty around us.


Welcoming Endless Color to Your Garden

With the right perennials, color never truly leaves your yard. It flows from spring flowers to summer blooms, from autumn tones to winter textures. Each season brings its own personality, yet the garden feels connected and whole. By planting thoughtfully now, you create a living canvas that changes but never fades—a space that gives joy in every month of the year.

Posted on

Are Garden Snakes Poisonous?

Are Garden Snakes Poisonous?

When you see a slender snake slithering through your flower bed or vegetable patch, your first thought might be: “Is it dangerous?” This is a natural worry. After all, many of us grow up hearing about venomous snakes and the risks they pose. But here’s the truth: most garden snakes are harmless. In fact, many of them help more than they harm.

To understand why, let’s explore what garden snakes really are, how they behave, and what role they play in your backyard ecosystem.


Understanding Garden Snakes

When people say “garden snake,” they usually mean garter snake. The name sounds similar, and over time the terms became interchangeable. Garter snakes are among the most common snakes you’ll spot in yards, fields, and gardens across North America.

They are slender, usually two to three feet long, with patterns of stripes or checks running down their bodies. Their colors vary—green, brown, gray, or even black with yellow stripes. They move quickly, but they are not aggressive toward people.

Most important, garter snakes are not poisonous to humans. They do have mild venom in their saliva, which they use to subdue small prey like frogs, worms, and insects. But this venom is so weak that it has no real effect on us. At worst, if one were to bite, you might feel a tiny scratch or mild irritation. For most people, it’s no different than a mosquito bite.

So when you see a garden snake, you can relax. It’s not a threat.


Helpful Role in the Garden

Instead of worrying about garden snakes, it’s better to see them as quiet helpers. They feed on pests that damage plants. Slugs, grasshoppers, crickets, and small rodents are all on their menu. By keeping these populations in check, snakes reduce the pressure on your vegetables and flowers.

Think of them as natural pest control. You don’t need to pay for sprays or traps when a garter snake patrols your beds. They work silently, blending into the mulch, striking only when needed.

Another bonus: their presence means your garden is healthy. Snakes avoid polluted or heavily disturbed areas. If they choose your yard, it often signals balance in your soil, plants, and wildlife.


Separating Fear from Facts

Why, then, do so many of us fear garden snakes? Much of it comes from misunderstanding. We confuse them with venomous species, or we jump at the sudden sight of something moving in the grass. But fear softens when facts take its place.

  • They are not aggressive. A garter snake would rather flee than fight.
  • They are not dangerous. Their mild venom only affects small prey.
  • They are beneficial. By eating pests, they support our gardening efforts.

Of course, it’s wise to show respect. Don’t pick them up, corner them, or handle them roughly. Like any wild creature, they deserve space. But once you understand their role, that quick flash of scales no longer feels like a threat—it feels like a sign your garden is alive and thriving.


Embracing Nature’s Balance

The next time you see a snake in your garden, remember: it’s not out to harm you. It’s there to find a meal, to live quietly, and to play its part in the web of life that surrounds your home.

By welcoming garden snakes instead of fearing them, we invite a healthier, more balanced space. We give up worry and gain an ally. And we discover that sometimes, what looks scary at first is actually a gift in disguise.


A Calmer View of Backyard Visitors

Garden snakes are not poisonous. They are not enemies. They are partners in the quiet work of keeping gardens strong. When we shift our perspective, fear turns to appreciation.

So the next time you glimpse a stripe slipping between the rows, smile. You’ve just spotted one of your garden’s best-kept secrets—a gentle guardian, hidden in plain sight.

Posted on

How to Keep Groundhogs Out of Your Garden

How to Keep Groundhogs Out of Your Garden

A thriving garden is a joy to behold. Flowers bloom, vegetables ripen, and greenery fills every corner. Then, almost overnight, you find leaves chewed, stems snapped, and tunnels weaving under your beds. The culprit? A groundhog. These furry foragers can undo weeks of care in just one afternoon. But with a few smart strategies, you can protect your garden and still respect the nature that surrounds us.


Why Groundhogs Target Gardens

Groundhogs, also called woodchucks, are natural grazers. They love tender greens, fruits, and vegetables. To them, your garden is a free buffet. Their strong claws make it easy to dig, and their sharp teeth make short work of stems and leaves.

They also work with determination. A groundhog doesn’t just nibble. It clears patches. It may even dig burrows nearby, making your garden part of its territory. Understanding this behavior is the first step. Instead of frustration, we shift to strategy.


Best Methods to Protect Plants

Strong Fencing

The single most effective solution is a fence built with groundhogs in mind.

  • Height: At least 3 feet tall. Groundhogs can climb, so height matters.
  • Buried base: Extend the bottom of the fence 12–18 inches underground. Bend it outward at a right angle to stop digging.
  • Materials: Heavy-duty wire mesh or hardware cloth works best. Chicken wire alone is often too flimsy.
  • Top edge: Some gardeners bend the top outward to discourage climbing.

Garden Design Tricks

Simple changes in layout can deter groundhogs.

  • Raised beds: Taller beds are harder for them to climb into.
  • Barrier plants: While no plant is a perfect shield, groundhogs dislike strong scents like garlic, lavender, and mint. Planting these along borders can help.
  • Mulch borders: Thick gravel or stone edging makes digging less appealing.

Repellents and Deterrents

Groundhogs rely on scent, so disrupting that sense is effective.

  • Castor oil sprays: When mixed with water and applied to soil, it creates an unpleasant environment for digging.
  • Predator scents: Products with fox or coyote urine mimic danger.
  • Motion devices: Sprinklers or noise makers surprise intruders and encourage them to move on.

Consistency is important. Repellents fade with rain and time, so reapply as needed.


Gentle Control Through Habits

Beyond barriers, we can outsmart groundhogs with routine.

  • Harvest often: Leaving ripe vegetables in the garden attracts them. Keep produce picked and secure.
  • Remove cover: Groundhogs like hiding near hedges, woodpiles, or tall grass. Clearing these reduces their comfort zone.
  • Rotate crops: Changing what grows in certain beds can interrupt feeding patterns.

For stubborn visitors, live traps may be considered. These should always be used with care, following local guidelines for relocation. Humane options keep the balance between garden and wildlife.


Peaceful Coexistence With Nature

Keeping groundhogs out of your garden is about creating boundaries, not waging war. With fences that block, plants that deter, and routines that reduce temptation, you can protect your harvest without harming these curious creatures.

After all, a garden is more than food and flowers. It’s part of the larger landscape we share. When we design with both beauty and balance in mind, we create spaces where our work thrives and wildlife learns to pass by. That’s when our gardens truly feel alive, safe, and at peace.

Posted on

What Size Is a Garden Hose Fitting?

What Size Is a Garden Hose Fitting?

If you have ever stood in the garden with a leaky sprayer or a stubborn connector, you already know how much difference the right size hose fitting can make. Too small and the connection drips. Too large and it will not even attach. The good news is that garden hose fittings are not as confusing as they seem. With a little knowledge, you can pick the right size every time and avoid wasted water and wasted effort.

Garden hose fittings follow a simple system that has stayed steady for decades. Whether you are buying a new sprayer, connecting two hoses, or replacing an old fitting, knowing the right size means no guesswork. In this guide, we will take a deep dive into what size a garden hose fitting really is, why the numbers can seem tricky at first, and how you can use that information to make your outdoor chores smoother.


The Basics of Garden Hose Sizes

Most people are surprised to learn that garden hoses do not come in dozens of sizes. In fact, the majority of hoses in North America use only three common diameters.

Common Hose Diameters

  • 5/8 inch hose – The most common size for household use. This size delivers a steady flow of water without being too heavy to handle.
  • 3/4 inch hose – A larger size often used on farms, construction sites, or for jobs that require moving a lot of water quickly.
  • 1/2 inch hose – A smaller, lighter option that works well for light watering tasks but does not carry as much water volume.

The number you see refers to the inside diameter of the hose. That is the open space inside where water flows. A wider diameter means more water moves through at once. A smaller diameter keeps things light but reduces flow.

Why Diameter Matters

Think of the diameter like the size of a straw. A skinny straw delivers less liquid. A wide straw lets you gulp faster. In the garden, a larger diameter hose is helpful for sprinklers, filling pools, or washing cars. A smaller one is easier for quick hand watering.


Understanding Thread Standards

Hose size is only part of the puzzle. The other piece is the threading at the ends. This is what lets your hose screw onto a faucet, nozzle, or sprinkler.

Garden Hose Thread (GHT)

In the United States and Canada, garden hoses use a special thread called GHT, which stands for Garden Hose Thread. The size is 3/4 inch GHT for almost every standard hose end. That does not mean the hose itself is 3/4 inch wide. Instead, it refers to the thread size used on the fittings.

This is why your 5/8 inch hose and your 1/2 inch hose can both screw into the same spigot. They share the same thread standard at the ends.

Pipe Threads (NPT)

This is where some people get tripped up. Plumbing pipes in your home use NPT, which stands for National Pipe Thread. These look similar to GHT, but they are not the same. If you try to force an NPT part onto your garden hose, it will not seal properly. You will almost always end up with leaks.

The lesson is simple: garden hoses use GHT, not NPT. If you are buying adapters or specialty fittings, always check for that label.


Male vs Female Fittings

Once you know the diameter and thread, the next step is understanding the style of fitting.

  • Male fitting – Threads are on the outside.
  • Female fitting – Threads are on the inside.

Most hoses have one female end and one male end. The female end connects to the water spigot. The male end connects to nozzles, sprinklers, or another hose. This simple system allows hoses and tools to be linked together in many ways.


Choosing the Right Fitting for the Job

Now that we have the basics, let’s connect it to real-life garden work.

Everyday Watering

For most homeowners, a 5/8 inch hose with 3/4 inch GHT fittings is the standard. It is the size you see at hardware stores and garden centers. This size balances water flow with easy handling. It works with hand sprayers, sprinklers, and hose-end feeders.

Heavy-Duty Jobs

If you are running multiple sprinklers, filling large troughs, or washing vehicles with high water pressure, a 3/4 inch hose is a better choice. The fittings are still 3/4 inch GHT, but the wider hose diameter carries more water at once. It is heavier, but it saves time when moving big volumes.

Light Tasks

If you want something easy to drag around for watering pots or rinsing tools, a 1/2 inch hose is enough. The fittings still match standard GHT, so you can use the same nozzles. Just remember that the smaller hose will not power large sprinklers very well.


Special Adapters and Connectors

Sometimes, you need more than just a hose and a sprayer. Adapters expand what your hose can do.

  • Quick-connect systems – These let you snap attachments on and off without screwing them in each time.
  • Splitters – Also called “Y” connectors, these let you run two hoses from one spigot. Each side usually has its own shutoff valve.
  • Thread adapters – These allow you to connect garden hoses to plumbing lines or other specialty equipment. When buying, be sure to check that you are converting between NPT and GHT correctly.

Using the right connector means less stress and fewer leaks.


Why the Standard Works

You may wonder why most hoses, no matter the diameter, use the same 3/4 inch GHT fittings. The answer is simple: convenience. This standard means that almost any hose, sprayer, or sprinkler can work together. You can mix and match brands without worry.

Imagine if every company made different fittings. You would need special adapters just to water your lawn. Instead, the standard keeps things simple and saves all of us frustration.


Tips to Avoid Common Problems

Even with the right size, mistakes can happen. Here are a few quick tips to keep your fittings in good shape.

  • Use washers – Every female fitting should have a rubber washer inside. Without it, leaks are almost guaranteed.
  • Don’t overtighten – A snug fit is enough. Cranking down too hard can crack plastic fittings or strip threads.
  • Replace worn parts – If your hose end is bent or threads are worn, you can cut it off and attach a new replacement fitting. These are inexpensive and easy to install.
  • Protect from weather – Leaving hoses outside in freezing conditions can cause fittings to split. Coil and store them during winter.

The Clear Answer

So, what size is a garden hose fitting? For almost every home garden, the answer is simple: 3/4 inch GHT threading, usually on a 5/8 inch diameter hose. That is the standard size across North America.

There are smaller and larger hoses available, but the fittings themselves still follow that same 3/4 inch GHT rule. This makes life easier, because it means your nozzles and sprinklers will connect without hassle.


Flowing Forward With Confidence

With this knowledge, we no longer have to guess at the hardware store. We can pick the hose or fitting that matches our needs with full confidence. We know why the 5/8 inch hose is perfect for daily watering. We know when to use a 3/4 inch hose for heavy flow. And we understand why everything connects back to the 3/4 inch GHT thread.

In other words, the puzzle pieces are clear now. When we choose wisely, our garden chores become smoother, our connections tighter, and our watering more efficient. And instead of wrestling with leaks or mismatched parts, we get to enjoy the simple rhythm of water flowing just where we want it—steady, reliable, and ready for every bloom.

Posted on

How to Sharpen Garden Shears

How to Sharpen Garden Shears

Sharp garden shears make every cut smooth, clean, and effortless. Dull blades, on the other hand, crush stems, tear leaves, and leave you tired after only a few minutes of work. The good news is that sharpening shears is simple. With the right tools and a little care, you can restore their edge and make them feel brand new.

In this guide, we’ll walk through the steps to sharpen your garden shears. We’ll cover the tools you need, the method for sharpening, and a few tips to keep them sharp longer.


Getting Your Tools Ready

Before you start sharpening, you’ll want the right setup. Most sharpening jobs can be done with a sharpening file or a whetstone. A medium-grit diamond file works especially well because it’s durable and easy to handle.

You’ll also need:

  • A wire brush or steel wool to clean the blades.
  • A clamp or sturdy surface to hold the shears steady.
  • Safety gloves to protect your hands.
  • Lubricating oil to finish the job.

Begin by cleaning the blades. Use a brush to remove dried sap, dirt, and rust. Warm soapy water works if the buildup is heavy. Once the blades are clean and dry, you’re ready to sharpen.


Step-by-Step Sharpening

Now comes the satisfying part: restoring the edge.

1. Secure the shears.
Clamp the shears to a workbench, or hold them firmly against a flat surface. You want them steady so you can work the blade without slipping.

2. Find the bevel.
Shear blades are ground at a slight angle. This sloped edge, or bevel, is where you’ll focus. Place your file or stone along the bevel, matching the angle.

3. Sharpen in one direction.
Push the file along the blade in a single, smooth motion, always moving away from your body. Do not saw back and forth. Repeat five to ten strokes, checking the edge as you go. The blade should start to feel sharper and look polished along the bevel.

4. Work evenly.
If your shears have two cutting blades, sharpen both sides. If one side is flat (like on bypass shears), only sharpen the beveled edge, then lightly smooth the flat side to remove burrs.

5. Remove burrs.
Run the file lightly across the back edge or use fine-grit sandpaper to smooth tiny burrs. This keeps the cut clean and prevents snags.

6. Oil and finish.
Wipe the blades with a little lubricating oil. This prevents rust and keeps the motion smooth. Open and close the shears a few times to spread the oil.


Keeping Shears Sharp Longer

Once sharpened, you’ll want to keep that crisp edge as long as possible. A few simple habits make a big difference.

  • Clean after use. Sap and soil dull blades quickly. Wipe them down after each session.
  • Store dry. Moisture leads to rust. Keep shears in a shed or toolbox, not on damp ground.
  • Touch up often. A few strokes with a file every few weeks prevents heavy wear.
  • Avoid forcing cuts. Don’t use shears on woody stems thicker than they’re meant for. Forcing them chips the edge.

By treating your shears well, sharpening becomes a quick touch-up rather than a full repair.


Restoring Ease to Every Cut

Sharp shears don’t just save effort—they protect your plants. Clean cuts heal faster, resist disease, and look neater. When you take time to sharpen, you’re investing in both your tools and your garden’s health.

Instead of wrestling with dull blades, enjoy the smooth snip of sharp ones. With a file, a little patience, and regular care, your garden shears will always be ready to work alongside you.

That is the quiet joy of a well-kept tool—simple, reliable, and always sharp when you need it most.

Posted on

How to Start a Pollinator-Friendly Garden (Bees, Butterflies, and Hummingbirds)

How to Start a Pollinator-Friendly Garden (Bees, butterflies, and hummingbirds)

A pollinator-friendly garden is more than just beautiful flowers. It is a living space that supports bees, butterflies, hummingbirds, and other creatures that keep our ecosystems alive. These pollinators are vital for fruits, vegetables, and native plants to thrive. Without them, many of our favorite foods and flowers wouldn’t exist. Starting your own pollinator garden is easier than you might think, and the rewards are endless. You will see more life in your yard, enjoy colorful blooms, and know you’re helping nature in a powerful way.


Why Pollinators Matter

Pollinators move pollen from flower to flower. This simple act makes plants produce seeds and fruits. About one in every three bites of food you eat is thanks to a pollinator. Apples, tomatoes, blueberries, almonds, and even coffee depend on them. Yet, pollinator populations are in trouble. Habitat loss, pesticides, and climate changes have all reduced their numbers. Creating even a small garden space can make a big difference.


Choosing the Right Location

Start by picking a sunny spot. Most pollinator plants need six to eight hours of sunlight each day. A garden near your vegetables or fruit trees can boost harvests. Avoid areas with heavy foot traffic or where pets play often, so pollinators feel safe. If you only have a balcony or patio, don’t worry. A few containers with the right plants can still attract visitors.


Selecting Plants They Love

Pollinators need two things: nectar and pollen. The best gardens provide both all season long. Choose native plants whenever possible. Native flowers evolved alongside local pollinators and are their favorite food source.

Flowers for Bees

Bees love simple, open blooms they can land on. Good choices include:

  • Coneflowers (Echinacea)
  • Black-eyed Susans (Rudbeckia)
  • Bee balm (Monarda)
  • Goldenrod (Solidago)

Flowers for Butterflies

Butterflies are drawn to clusters of small flowers they can perch on. Try:

  • Milkweed (Asclepias) for monarchs
  • Zinnias for summer color
  • Lantana for constant nectar
  • Verbena for long bloom periods

Flowers for Hummingbirds

Hummingbirds love bright red, tubular flowers. Their long beaks are made for these blooms:

  • Trumpet vine
  • Salvia
  • Columbine
  • Cardinal flower

Mix these plants together so there’s food for every pollinator type.


Plant for Every Season

Pollinators are active from spring through fall. Plan your garden so something is always blooming.

  • Spring: Tulips, hyacinths, wild columbine
  • Summer: Sunflowers, bee balm, lavender
  • Fall: Asters, goldenrod, sedum

Layering blooms like this ensures pollinators never go hungry.


Provide More Than Flowers

A true pollinator garden offers food, water, and shelter.

  • Water: A shallow birdbath or dish with pebbles works perfectly. Pollinators need a place to land while they drink.
  • Shelter: Leave a few bare spots of soil for ground-nesting bees. Add small logs or branches for overwintering insects.
  • Host Plants: Caterpillars need food too. Milkweed feeds monarch caterpillars, parsley feeds swallowtails, and passion vine feeds Gulf fritillaries.

Skip the Chemicals

Pesticides and herbicides harm pollinators, even in tiny amounts. If you must treat pests, use natural methods like hand-picking bugs or introducing beneficial insects (ladybugs, lacewings). Avoid spraying while plants are in bloom.


Create a Welcoming Design

Pollinator gardens don’t need to be wild or messy. Plant in groups of three or more so pollinators notice them from afar. Combine tall and short plants for layers of color. Add paths or stepping stones for easy maintenance. If space is tight, vertical planters or hanging baskets can still help.


Attracting Pollinators Year After Year

Once your garden is established, it will get better each season. Perennials will grow larger, and pollinators will learn to return. Leave some seed heads standing through winter to provide food and shelter. Over time, you’ll notice more butterflies, more hummingbirds, and busier bees.


Benefits Beyond the Garden

A pollinator garden is not just for wildlife. It creates a peaceful space for you too. Watching butterflies drift from flower to flower or hearing hummingbirds buzz by is deeply calming. Children learn about nature firsthand. Neighbors may even be inspired to start their own gardens. Together, these small spaces form a network of safe havens for pollinators everywhere.


Small Steps Make Big Changes

You don’t need acres of land or a perfect plan. Start with a few native flowers in one sunny corner. Add a shallow dish of water. Skip the chemicals. Over time, expand with more plants and blooms for every season. Every patch of habitat helps. Pollinators will find it, and they will thank you with life, color, and movement all season long.


A Garden That Gives Back

When you plant for pollinators, you do more than decorate your yard. You give bees, butterflies, and hummingbirds a safe place to thrive. In return, they bring beauty, joy, and abundance to your world. This partnership is as old as nature itself. And it begins with a single flower in your hand.

Posted on

How to Keep Chipmunks Out of Your Garden

How to Keep Chipmunks Out of Your Garden

A garden full of fresh blooms and ripening produce is a gift. But if you’ve spotted little tunnels, dug-up bulbs, or half-eaten fruit, you may have tiny striped visitors. Chipmunks, while adorable, can quickly become disruptive. They dig for seeds, snack on berries, and stash food in your beds. The good news is that we can keep them at bay without spoiling the beauty or peace of our garden.


Why Chipmunks Target Gardens

Chipmunks are opportunists. They forage constantly, looking for seeds, nuts, fruits, and young plants. Your garden offers all of these in one place. Loose soil is easy for them to dig, and low-growing plants are simple to reach. They don’t just take a little—they often uproot or damage plants in the process.

Understanding this habit helps us protect our spaces. Instead of seeing them as pests, we see them as hungry neighbors who need gentle boundaries.


Smart Ways to Protect Plants

Fencing and Barriers

A sturdy fence makes the biggest difference, but chipmunks are small and clever.

  • Hardware cloth: Use ¼-inch mesh around raised beds and bury it 8–12 inches deep to block tunnels.
  • Bulb cages: When planting tulips or other favorites, enclose bulbs in wire mesh so chipmunks can’t dig them up.
  • Row covers: Lightweight fabric or mesh can shield seedlings until they’re strong enough to withstand some nibbles.

Natural Deterrents

Scents play a powerful role. Chipmunks dislike strong smells, so use that to your advantage.

  • Garlic and hot pepper sprays: Apply around plants and soil. Reapply after rain.
  • Predator scents: Products made with fox or coyote urine can create the illusion of danger.
  • Herbs and flowers: Planting strong-scented companions like mint, daffodils, or alliums along borders helps discourage digging.

Motion and Surprise

Chipmunks don’t like surprises.

  • Motion-activated sprinklers: A quick burst of water sends them running.
  • Wind spinners or reflective tape: Sudden flashes and movement make the area feel unsafe.
  • Ultrasonic devices: Some gardeners find success with these, though results vary.

Building Better Habits Around the Garden

Beyond barriers and sprays, your own habits can help reduce visits.

  • Harvest often: Don’t leave fruit or vegetables to overripen—it attracts chipmunks.
  • Clean up fallen produce: Any apples, berries, or seeds on the ground are an open invitation.
  • Remove hiding spots: Chipmunks love brush piles, wood stacks, and tall grass. Keeping the garden edges clear reduces their comfort.
  • Feeders with care: If you have bird feeders, use baffles and trays to minimize seed spills, which draw chipmunks closer.

Creating Balance With Wildlife

The goal is not to drive chipmunks away from nature. It’s to guide them away from your hard work. With smart fencing, natural repellents, and a little change in routine, you can protect your plants and still enjoy the life around you.

A garden is a shared space. When we learn how to set gentle boundaries, we get to enjoy ripe tomatoes, blooming flowers, and the peace of knowing our efforts will last. In the end, the balance between beauty and wildlife makes the garden even richer.